

The most useful tool: System File Check
The second level of Windows repair
The third level of Windows repair
The fourth level of Windows repair
Second most useful tool: drivers from a PC manufacturer
Investigate blue screen events
Your antivirus missed this: adware
Methods for encryption of data
Both the source folder and backup folder are not encrypted
Both the source folder and backup folder are encrypted with BestCrypt or BitLocker (not EFS)
Both the source and backup are encrypted 7-Zip archives
How to create a System recovery drive
Gray background in program windows
APPENDIX I: Reliable detection and elimination of errors on a hard drive
APPENDIX II: If Windows 10 fails to get upgraded or if you want to stop upgrades
APPENDIX III: Clean reinstallation of Windows
MAKE YOUR PC STABLE AND FAST:
What Microsoft Forgot to Tell You
Charles Spender
Distributed by Smashwords
February 22, 2025; ISBN: 9781311942241
Copyright © 2015 Charles Spender
This ebook in high-quality EPUB and MOBI format can be downloaded here or here.
BOOK AT A GLANCE: This manual recommends avoiding all kinds of software for "optimization" or "tweaking" of Windows or "cleaning" of the Windows registry because these tools will make your Windows more unstable and buggier. People who write this kind of software believe that they know more about Windows than Microsoft does. To optimize and repair your Windows installation, you need to use Windows own tools in Windows Command Prompt: CHKDSK, SFC, and DISM. Besides, you need to install the latest hardware drivers from the website of a PC manufacturer. Only these four methods can make your PC stabler and more reliable. Besides, minimizing the number of simultaneously plugged-in peripheral devices will make Windows stabler too. To diagnose hardware problems, use Windows Troubleshooter. To make your computer faster, you need to upgrade your hardware, no software will help you in this regard. To prepare for a catastrophic failure, create a system recovery drive and use Windows Restore and AOMEI Backupper Standard, free version. As soon as you achieve a stable configuration of Microsoft Windows and Office, disable all updates (because many of them are buggy), while maintaining system security with a good antivirus. Wait at least 1 year before installing a newly released version of Windows and 6 months before installing a new version of Microsoft Office. With all the problems of Windows, it is still more convenient than Macintosh. Use encryption software to protect your sensitive information and be sure to change privacy settings in Windows, Office, and your web browser.
The amount of technical support information for Microsoft Windows is overwhelming. For most PC users, it is difficult to separate good information from bad and to devise any concrete troubleshooting plan that they can use regularly. This booklet provides a summary of key points that can serve as a maintenance and troubleshooting plan for your PC. The ebook is organized as several small chapters (who needs another massive book about Windows?); each chapter provides key information on a topic, and a link or links to more detailed information that has been tested by this author and is available for free on the Internet.
If your PC crashes every few days (freezes or displays a "blue screen of death") or if you are experiencing other computer problems, this booklet can serve as an easy checklist for troubleshooting. Even if you are not currently experiencing serious technical problems with your computer, this booklet will help to speed up your PC, to take full advantage of all Windows features, and to prevent disasters that can put your computer out of commission for several days and wipe out your precious data.
This ebook is designed for users of Windows 7, Windows 8.1, Windows 10, and Windows 11. Unless stated otherwise, when Windows 10 is mentioned in this book, I mean Windows 10 and 11. Before we begin, change your Windows settings such that all file extensions are always visible. Go to the Control Panel (in Windows 10, 11: Start button → All apps → Windows System; in Windows 8.1: Start button → "Settings" → [at the bottom] Control Panel). Then double-click "Folder Options" (Windows XP/Vista/7/8) or "File Explorer Options" (Windows 10, 11), select the "View" tab, and uncheck the options "Hide extensions for known file types" and "Hide protected operating system files." You will need to see the extensions of certain files while following instructions in this ebook. I recommend pinning the Control Panel to your task bar (because we will use it often):
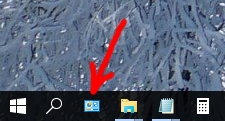
To accomplish this task, click the Start button, type "Control Panel" then right-click the Control Panel shortcut and select "Pin to taskbar." Also take a note of the "bit" of your Windows (whether it's a 32-bit or 64-bit operating system). Go to the Control Panel → System and look at the section "System type":
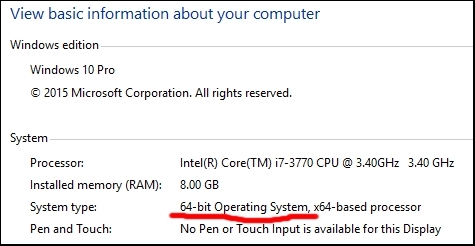
The size of your random-access memory (RAM) is also listed there. When following instructions in this ebook, you will notice that some software applications can be installed as either a 32-bit or 64-bit version. You need to select the version that matches the bit of your Windows (note that 32-bit programs are sometimes labeled "X86" instead of "32-bit"). To successfully follow instructions in this ebook, you will have to be logged into a Windows user account of the "Administrator" type.
If you want to print out any portion of this ebook on paper, you can do it in Calibre e-book viewer. After installing Calibre on your PC, go to "Start" → "Programs" (or "All apps") → "Calibre e-book management," and select "E-book viewer." In the upper left-hand corner of the program window, you will find the button "Open e-book." After you open the ebook file (.azw, .mobi, or .epub), look at the lower left-hand corner of the Calibre e-book viewer window, and you will find the "Print" button (or an arrow that expands the view to show this button).
Windows 10 and 11 users can read about Windows Update settings below. Finally, it would be worthwhile to spend 15 to 30 minutes learning about the basics of your version of Windows. See one of the following summaries of Windows features (out of the horse's mouth):
Windows 11:
https://www.microsoft.com/en-us/windows/windows-11
Windows 10:
http://windows.microsoft.com/en-us/windows-10/getstarted-whatsnew-cortana
Windows 8.1:
http://windows.microsoft.com/en-us/windows/previous-support#1TC=windows-8
Windows 7:
http://windows.microsoft.com/en-us/windows/previous-support#1TC=windows-7
Windows 10 and 11 users: First of all, I recommend Windows 10 and 11 if you want to have the latest and most advanced hardware. Just as any newly released version of Windows, I do not recommend the latest versions of Windows because some time needs to pass before Microsoft fixes most of the bugs (at least 6 months, better wait for a year).
The latest major updates of Windows 10 and 11 (Microsoft calls them "upgrades") take a major effort to install (see Appendix II "If Windows fails to get updated"), and therefore, my advice is to prevent them from installing automatically. Minor Windows updates can introduce new bugs and make your Windows unstable. Therefore, after you achieve a stable configuration of Windows (as described in this ebook), it's a good idea to permanently disable all Windows updates (but you must have a good antivirus). If you have a Professional or more expensive version of Windows, then go to the "Start" menu → Settings → Update and Security → Windows Update → Advanced Options:
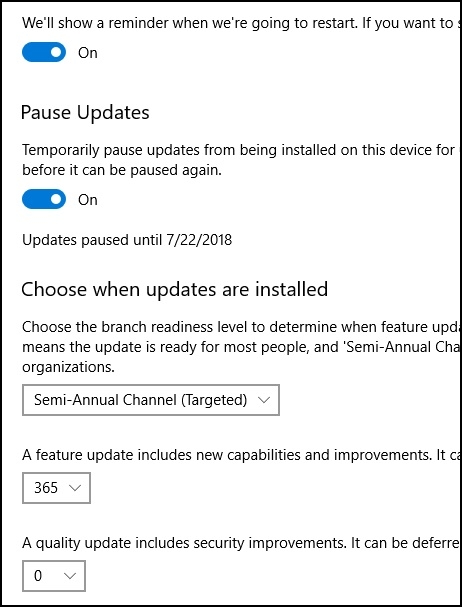
The above settings will create a false impression that you have control over Windows Updates. In reality, Microsoft sometimes ignores all your preferences (including more sophisticated settings in Group Policy and Windows registry) and decides to install some updates or upgrades against your will. To permanently disable all Windows updates, use free software called Sordum Windows Update Blocker (for Windows 11, use this software instead, the "Updates" tab). For details, see Appendix II. You should turn off Windows Update Blocker (and turn off the internet connection) when you perform such system tasks as installing Visual C++ distributable, using System Restore, and performing System File Check. (To permanently disable Windows Defender Antivirus, use software called Sordum Defender Control; don't use any such software with Windows 11 because it will cause major problems; you will have to disable Windows Defender manually in Windows settings.)
It should be mentioned that your privacy is severely compromised by default in the latest versions of Office and Windows. Search the Internet on how to improve privacy in Windows and Office settings, but don't do this in Windows registry or Group Policy because you will screw up your Windows installation (these settings are easily and often ignored by Microsoft too). If you must change some settings in the registry or Group Policy, then always create a restore point in Windows before you do. Under no circumstances should you use Google Chrome for browsing the Internet because you will have no privacy. Mozilla Firefox is better (after you change the privacy settings there). Use CCleaner to remove traces of your activity from the computer and use encryption software such as BestCrypt and WinRAR to protect your personal documents and to wipe the hard drive and RAM after deletion of documents. Sign up for a VPN service using Bitcoin and/or use the Tor browser or VPN in the Opera browser for completely private browsing of the Internet invisible to your government and Internet service provider. A more advanced privacy tool is a virtual machine in VMWare (which allows you to run several versions of Windows simultaneously on the same computer), especially if the product key for the virtual Windows is not associated with your name. Because antivirus software also monitors all your activities, it's a good idea to buy a license for your favorite antivirus program for cash at a computer store (without the store card for anonymity) and to not register this software under your real name and known e-mail. Of course, you need to change privacy settings too, in order to make sure that you send as little information about your activities as possible to the maker of the antivirus. Turn off antivirus scanning of e-mail both in the antivirus software and in your e-mail program (e.g., Kapersky add-in in Outlook, you need to launch Outlook as an admin to make this change). Furthermore, examine all the programs that run in the background and know your identity and therefore can log your IP address and monitor other parameters. For example, do not log into the NVIDIA software that comes with your video driver. Finally, turn off the location function (GPS tracking) on your smartphone and turn it on only when you need it and don't use any shopping cards or store cards because they track your shopping habits.
First of all, if your computer fails to start, and you suspect that the reason is that you accidentally hit the computer with some heavy object or dropped the computer from a small height, then you can try to revive your hardware by disassembling and reassembling your PC as described at the end of the section "How to create a System recovery drive." If you are able to start your PC, then you can continue reading.
Before launching system file check, I strongly recommend to check for defects the disk where Windows is installed (typically drive C) by means of another Windows utility: CHKDSK. You need to do this even if you have a so-called solid-state drive, i.e., a hard drive based on flash memory. To launch CHKDSK, right-click drive C in File Explorer (called Windows Explorer in older versions of Windows):
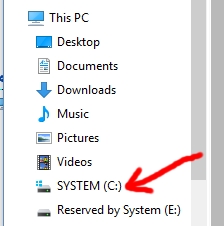
select "Properties," tab "Tools," and click "Check" in the section "Error checking":
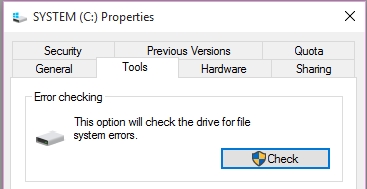
Most likely, this program will ask you to restart the PC, and then CHKDSK will test the hard drive for defects before launching Windows. The method described above often fails to perform a comprehensive test of your hard drive (which should last for several hours), especially in the latest versions of Windows. If the above procedure lasted only a few minutes, then you need to launch CHKDSK from Windows Command Prompt as follows.
First, close all programs and then press the Windows key and type "cmd" (without quotes), or in older versions of Windows, find a program called "Windows Command Prompt" in your Start menu (usually in "Programs" → "Accessories"). Right-click the shortcut for Windows Command Prompt:
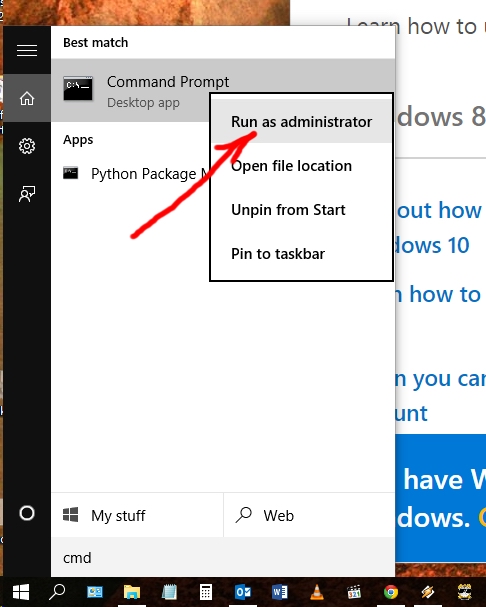
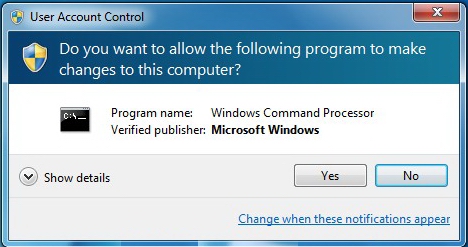
and select "Run as administrator." If a "User Account Control" dialog appears, click "Yes":
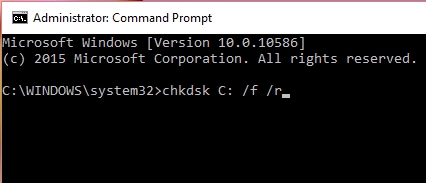
In the Command Prompt window, type the command "chkdsk C: /f /r" (without quotes) and press the "Enter" key:
Most likely, the program will tell you that you will have to restart your computer to complete this task:
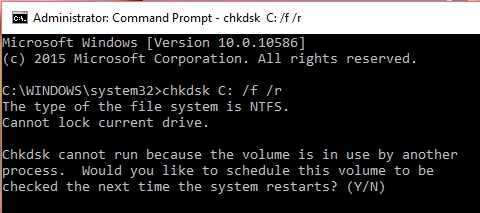
Press the Y key and then the Enter key. Next, close the Command Prompt window and restart your computer. CHKDSK will slowly and carefully verify the physical state of your hard drive, will find bad sectors if there are any, and will make sure that Windows does not use them in the future. If CHKDSK fails (gets stuck and cannot finish the job), then see the Appendix, which describes a more reliable (but more technical) procedure for hard drive analysis and repair. For more details on CHKDSK, see this web page:
http://www.howtogeek.com/howto/windows-vista/guide-to-using-check-disk-in-windows-vista/
Now that your system hard drive is in good shape, we can proceed. Whether you are experiencing computer problems or not, Windows' own tool called System File Check will be beneficial. This tool verifies all key files of the Windows operating system and corrects them if they got damaged. To launch System File Check, close all programs and start Windows Command Prompt in the Admin mode as described above. In the Command Prompt window, type the command "sfc /scannow" (without quotes) and press the "Enter" key:
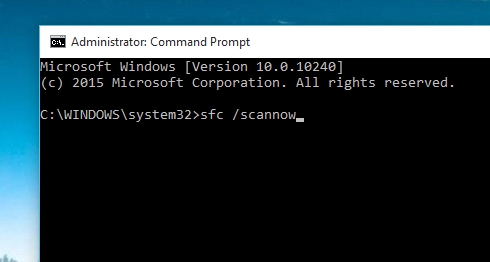
System File Check will start verifying the files and may take 5 to 30 minutes. After it's done, typically, it will report that it found some errors and successfully fixed them. If System File Check reports that it could not access or fix some files, then my advice is to read the following more detailed tutorial:
https://www.winhelp.us/troubleshooting-windows.html
Regarding error messages not mentioned in the above tutorial, you can type the error message into your search engine and find a solution yourself. Alternatively, you can try the solution described in the next subsection: "The second level of Windows repair." Believe it or not, I have seen System File Check find and fix problems even after a clean installation of Windows.
Furthermore, if your Microsoft Office is acting up, you can repair it too. First, try disabling various third-party add-ins (in each Office program, select menu "File" → "Options" → "Add-ins" → button "Go"). In the event that you remember that you installed your current version of Office while a previous version of Office was present on your computer, then it is best to uninstall Office (all versions and related programs such as language packs), reboot the computer, and then reinstall your latest Office from scratch. You do not have to save your Office settings if you are reinstalling Office on the same computer under the same Windows. When you uninstall Office, all your Office settings will be saved in the Windows registry and in your Windows account's files.
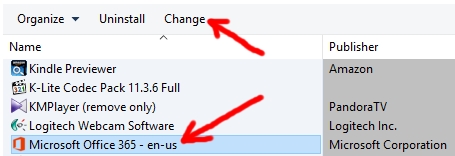
If your Microsoft Office package misbehaves, and it was not installed simultaneously with a previous version of Office, then I recommend going to the Control Panel → "Programs and Features"; there, you select Microsoft Office in the list, and press the "Change" button:
Now select either "Quick Repair" or "Online Repair":
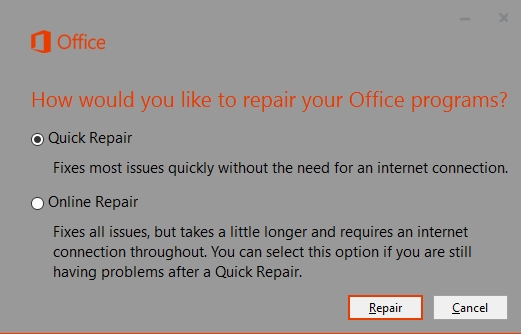
(These options may vary for different versions of Office.) For prophylaxis, implement both options, with Online Repair being first. Now your Office should work much better and more reliably. Later, you can turn off Office updates: in any Office program, select the menu "File" → "Account" → "Update Options."
My advice is to never install a new version of Windows or Office right after it is launched by Microsoft. It is best to wait at least 6 months (new Office) or 12 months (new Windows), while Microsoft fixes various bugs and device manufacturers develop new drivers, and then you can install a problem-free new version of Office or Windows. The same goes for major updates to Windows that do not come via the Windows Update function of your operating system. For example, the Windows 10 Creator's Update of April 2017 was a disaster. Yes, it had some new features, but it was unstable and full of bugs. Wait until any major Windows update becomes incorporated into the automatic Windows Update program. Of course, you should not subscribe to Microsoft's Windows insider and Office insider programs, which allow you to install poorly tested new versions of Windows and Office. Incidentally, I do not recommend Microsoft Office 2021 if you are subscribed to Microsoft Office 365, i.e., Office 2016. You will hardly gain anything new; this appears to be a marketing trick on the part of Microsoft, much like Windows Me.
I am cursing myself for not following my own advice with Office 2016 because Word had been crashing during a spellcheck of complex files for about five months after its launch (now it's stable). During the first several months after its launch, Word 2013 was unstable too.
When you are installing a new version of Windows, it is best to save all your documents and settings and to perform a "clean installation" rather than an upgrade (a clean installation is usually more stable). You don't need to perform clean installation of major updates of the same version of Windows, for example, if you have Windows 10 and want to install Windows 10 April 2018 Update.
Likewise, before installing a new version of Office, for example, Office 2021, you need to uninstall the previous one, for instance, Office 2019 (do not upgrade). Again, you do not have to save your Office settings if you are installing new Office on the same computer under the same Windows. The only exception is when you are upgrading to a new build of the same version of Windows, as part of Windows Updates. In this case it is OK to upgrade instead of a clean installation.
A word of caution: if you are using a pirated version of Windows, it will always have some tiny defects resulting either from repeated copying on the Internet or from an imperfect activation procedure or from problems with updates. Although this kind of Windows installation will work most of the time, these tiny problems will make themselves known from time to time, often at the most inconvenient moment. Even if you choose to use cracked versions of all other software, my advice is to use a licensed version of Windows to ensure the best performance and stability of your computer.
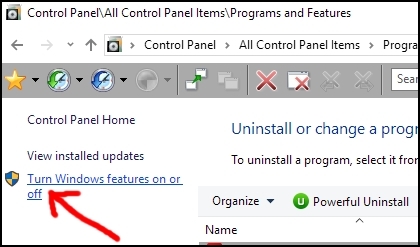
Although System File Check is a useful utility, it does not check all system files thoroughly, and sometimes it can give you numerous hard-to-understand errors. This is where a cool feature called DISM or Deployment Imaging and Servicing Management comes in handy. DISM checks all system files much more thoroughly than System File Check does. Even if System File Check finished all the checks and repairs successfully, you still need DISM because it is more thorough and will find problems that System File Check didn't. Before you run DISM, make sure that you have all the latest Windows Updates (not the latest feature updates) and install the latest dotNET framework (version 4.7.2 as of this writing). Without the latest dotNET framework, DISM may fail. If you have Windows 8.1 or 10, go to the Control Panel → Programs and Features → Turn Windows features on or off:
Select all the features of the latest .NET framework and press "OK":
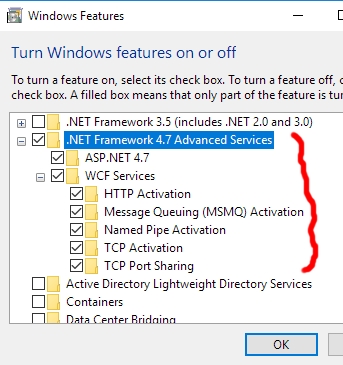
If you have Windows 7, then download the latest dotNET framework through Windows Update or find it on the Microsoft website as an offline installation package. Incidentally, DISM does not work for Windows 7, and you need to instead download another useful tool called System Update Readiness Tool. It produces results similar to those of DISM. Users of Windows 8.1 and 10 now can launch the Windows Command Prompt as Admin and type the following command:
DISM /Online /Cleanup-Image /RestoreHealth
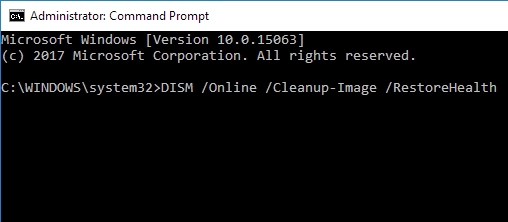
Press the Enter key, and wait for 5 to 30 minutes until DISM finishes all the checks and repairs system files if necessary by downloading them from the Windows Update website. Be patient. If DISM finished all the repairs and checks successfully, then you can congratulate yourself because your Windows is in perfect health because it passed both System File Check and DISM. Windows 7 users can celebrate too if the System Update Readiness Tool worked successfully. These procedures are likely to turn off or reset Windows System Restore. Go to Control Panel → System → System Protection (upper left corner) and make sure that System Restore is turned on on drive C, press the "Configure" button and make certain that there is sufficient disk space allocated to restore points (say 5% of disk size). Create a new restore point to celebrate this milestone in your Windows health.
In case the Readiness Tool or DISM cannot finish the repairs and gives you some errors, then you can check the more detailed tutorials below or search the Internet for your particular error. If you still cannot find the solution to your problem, then you have two options: call Microsoft and get paid support or perform repair installation of Windows also known as an "in-place upgrade." Don't fear, the in-place upgrade will preserve all your documents, settings, and programs. This procedure is described in the next subsection: "The fourth level of Windows repair." Calling Microsoft is a good option if you have plenty of money but are short on time.
Remember that you don't need to reinstall Windows if you are experiencing problems with one function or device. Avail yourself of the "Troubleshoot" function of Windows (see the text section "The third level of Windows repair"). The System Restore function of Windows is also useful. Be sure to turn it on on your drive C. You can learn more about System Restore here.
In addition to the latest dotNET framework, it will be a good idea to install the Microsoft Visual C++ 2005-2008-2010-2012-2013-2015-2019 Redistributable Packages. In conclusion, as promised, here are the more detailed tutorials on DISM and the System Update Readiness Tool:
Windows 7:
https://www.sevenforums.com/tutorials/111245-troubleshooting-system-update-readiness-tool.html
Windows 8.1:
https://www.eightforums.com/tutorials/26512-dism-fixing-component-store-corruption-windows-8-a.html
Windows 10:
https://www.tenforums.com/tutorials/7808-use-dism-repair-windows-10-image.html
This is the Windows Troubleshooter, which can diagnose and repair some problems with your PC and/or Windows. To access this function on a Windows 10 machine, hold and press the Windows key and press the "I" key; then select "Update and Security" and "Troubleshoot." On a Windows 8.1 computer, press the Windows key and type "troubleshooting" into the search field. Select the result "Troubleshooting." If you have Windows 7, then go to the Control Panel, click "System and Security," and within Action Center, click "Find and Fix Problems (Troubleshooting)." Look around and explore all the available troubleshooting options before any actual problems happen.
Your goal is to pass both System File Check and DISM (or the System Update Readiness Tool on a Windows 7 machine). In this case, your Windows is in top shape, and you have nothing to worry about. If you can't pass these checks, then there is something wrong with your Windows installation, perhaps the files needed for these repairs got corrupted.
If System Restore does not help (don't forget to temporarily turn off Windows Update Blocker), then there is one last option: in-place upgrade also known as a Windows repair installation. This procedure preserves all your files, settings, and programs (with some tiny exceptions, as you will learn later). Actually, if you have plenty of money and are short on time, you can call Microsoft and get paid support on DISM or System File Check. Otherwise, get ready to repair your Windows installation by the in-place upgrade.
First, you need to get your hands on a DVD or ISO file with the exact same version of Windows as the one you are trying to repair. Everything should match: language, edition [Pro, Home, etc.], and build number [e.g., build 10.0.15063 a.k.a. version 1703, or Creators Upgrade of Windows 10]. If the Windows version does not match exactly, then the repair installation will either fail or you will lose all your settings and some programs. You can determine the native language of your installed Windows in several ways described here. Note that "English" (i.e., US English) and "English International" or "English United Kingdom" are different versions of Windows. Identifying the original native Windows language can be tricky if you have Windows Professional, which allows you to easily change the interface language. The native language of your installed Windows is not difficult to determine: it matches the language seen on the welcome screen (or lock screen) after you shut down your computer and then start it manually. It also matches the language of messages when Windows is being updated, immediately before rebooting: "Working on updates. ... 33% completed. Don't turn off your computer." It also matches the language of the Windows Recovery Environment (described later in the subsection "How to create a System recovery drive"). You can find out the version of Windows 10 by pressing the "Start" button, then the "Settings" button immediately above, then select "System" and "About." The build number is visible when you launch the Windows Command Prompt as Admin.
You can easily find various characteristics of your Windows DVD or ISO file. Search the internet for your "how to" questions. For example, to determine the version of a USB Windows 10 installation drive, type the following command in Windows Command Prompt:
dism /Get-WimInfo /WimFile:H:\sources\Boot.wim /index:1
where you need to replace "H:" with the appropriate drive letter. Various versions and build numbers of Windows 10 are listed here.
Fortunately, you can download an ISO file (the file that can be used to create an installation DVD or USB drive) of various versions of Windows by means of a nice program called Heidoc Windows ISO Download Tool. For instance, I downloaded the following version: Windows 10 Pro, English, Creators Upgrade (March 2017, version 1703), 64 bit. It is important to check the hash code of the downloaded file to make sure that it did not get corrupted during the download. The Heidoc tool has a botton "Hash Archive" where you can find the hash of your version of Windows, then install a small program called HashTab, use it to calculate the hash sequence of your downloaded file, and compare the two numbers. They must match if your downloaded ISO file is not damaged.
Now that you have the correct installation media, you can get right to the repair installation of Windows. See the following tutorials:
Windows 7:
https://www.sevenforums.com/tutorials/3413-repair-install.html
Windows 8.1:
https://www.eightforums.com/tutorials/26095-repair-install-windows-8-a.html
Windows 10:
https://www.tenforums.com/tutorials/16397-repair-install-windows-10-place-upgrade.html
You can burn the ISO file to a writable DVD disk by right-clicking on the ISO file in Windows 8 or 10. You can also create a bootable USB installation drive from the ISO file using a neat tool called Rufus as described here. After this fourth level of repair, you should be able to pass the System File Check and DISM/Readiness Tool with flying colors. There is of course the fifth level: clean installation of Windows, where you will lose all your settings and programs. I am not discussing the additional options "Refresh Windows" and "Reset Windows" because you will lose most settings and programs there.
Many crashes in Windows are caused by outdated drivers of various devices in your computer. A driver is a piece of software that tells Windows how to use a particular device, such as a video card or a printer. Unfortunately, even when a manufacturer of the device (such as Intel, AMD, or Hewlett-Packard) releases a well-tested new version of a driver, Windows usually cannot see this update. For example, if you go to the Control Panel → "Device Manager" and select a device, such as a video card:
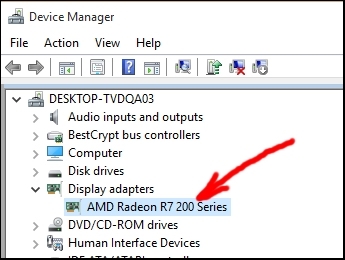
right-click, select "Update the driver software," and click "Search automatically for updated driver software":
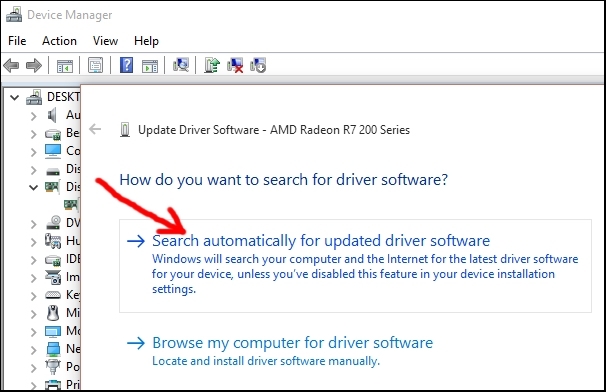
then Windows will most likely tell you that "The best driver software for your device is already installed" even if the driver software is five years old and the manufacturer has released several updates during those years. Outdated drivers cause Windows to crash for several reasons: the outdated driver may be a piece of generic software written by Microsoft and does not fully match all features of the device, or the driver software is a "work in progress" by the manufacturer of the device after Microsoft released a new version of Windows. In the latter case, the first version of the driver for the new version of Windows contains many bugs and requires further testing and improvement by the manufacturer of the device.
My advice is to visit the website of the manufacturer of your motherboard (for a desktop PC) or your notebook computer and to download all the latest recommended drivers there. After that, check this website periodically (once or twice a year) for updated drivers.
Another way to find driver updates for free is free system software that may come with your motherboard or notebook computer. It may have an option for finding software and driver updates, for example, this is the case for the APP Center software that comes with motherboards from Gigabyte Technology. I recommend this method.
Don't use any third-party software (e.g., Driver Booster) that searches for drivers automatically. Even though it can find newer drivers for devices inside your computer, these drivers have not been tested thoroughly for full compatibility with your motherboard or notebook computer. Therefore, these newer drivers may cause new troubles. The problem is compounded by the fact that many driver updaters (e.g., Snappy Driver Installer) are buggy and install incorrect drivers or correct drivers incorrectly, thereby destabilizing your Windows.
In my view, the least problematic software in this regard is Driver Booster, which you can download from CNET's download.com website or from iobit.com. I still don't recommend it, perhaps only in rare cases as an exception, for example, if you have made the big mistake of upgrading Windows on your computer to the newest version just released by Microsoft (normally, you should wait at least a year). Another exception is the video card driver, which you can update manually as often as you wish (it must be WHQL, i.e. certified by Microsoft). My advice is to always install drivers for the video card by hand, not through Driver Booster.
IMPORTANT: Open the settings of your graphics card software that came with the graphics card driver and turn off various optional features, following the KISS (keep it simple stupid) principle. Some of these features may cause your computer to crash. For instance, if you have an AMD Radeon graphics card, then open the AMD Radeon Settings and select "Default" in the "Video" tab, turn off everything in the "Display" tab, then in the "Home" tab, press the "Preferences" button, select "Radeon additional settings" and turn off everything there, especially the "Smart Sleep" option under power settings. Because of the latter feature, my computer used to crash several times a week after a period of inactivity (the display gets turned off by Windows but cannot be revived after that, without rebooting the hard way).
It is also a good idea to update BIOS (or UEFI) in your motherboard to minimize system failures due to hardware. Download the latest version of BIOS (UEFI) on the website of the manufacturer of your motherboard, then unpack it and save to a USB drive (must be formatted with a FAT16 or FAT32 file system). See the user manual of your motherboard (can also be found on the manufacturer's website) regarding how to update BIOS (UEFI).
To enter BIOS (UEFI) settings: Restart your computer and examine the first images and text that appear on the screen (a.k.a., the "motherboard splash screen"). It should say at the bottom of the screen something like "Press Del or F12 to enter Setup." Restart your computer again, and repeatedly press the key that was mentioned during the splash screen. This is the "magical key" that you can use to access BIOS (UEFI) settings. In case your computer has the "Fast boot" option enabled, then you won't see the motherboard splash screen during the startup, but you still need to find out the name of this magical key for your motherboard. Search the Internet or user manual of the motherboard to find out which key has to be pressed on the keyboard to enter the BIOS (UEFI) settings for your motherboard (before Windows boots). Restart the computer and press this key repeatedly.
Readers can skip the rest of this chapter. After you install and launch Driver Booster, go to the "Options":
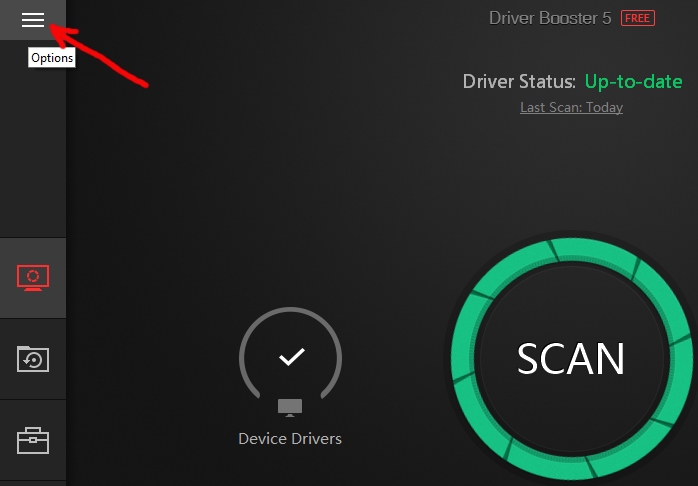
Select "Settings," scroll down, and then make sure that the following option is selected: "Only show drivers that pass WHQL tests" (i.e., those that were officially tested and certified by Microsoft). Click "OK" or close the "Settings" dialog window.
Now press the "Scan" button. Driver Booster will scan your system and compare your drivers with its internet database of updates and then will show you a long list of outdated and up-to-date drivers on your computer. If you see driver updates for the video adapter (a.k.a. video card; you can find its name by going to the Control Panel → "Device Manager"), do not install it via Driver Booster. On the right-hand side of the program window, you will see a small down arrow in the "Update" button that corresponds to the video adapter. Click this little arrow and select "Ignore this device." Now go to your network adapter's manufacturer's website and download and install this new driver by hand (select only a certified or WHQL driver there).
As you can see, updating drivers involves not only searching for new drivers but also avoiding beta drivers. Beta drivers for the video card can destabilize your Windows, resulting in frequent blue screens. Beta drivers for other devices within your computer are unlikely to have such dramatic effects, and they are less common. Now that we excluded unstable drivers, to the right of an outdated driver in Driver Booster, you can click "Update."
The free version of Driver Booster does not download all the latest drivers and may offer you to download some latest drivers via a paid version of the program "Driver Booster Pro." You can ignore this little problem because drivers that are one or two months old are perfectly fine (much better than drivers that are several years old), and you can get by without all the latest ones. In program settings, you can select automatic checking for new drivers (monthly updates or no updates will be OK).
In the unlikely event that some device starts malfunctioning after you install a new driver, in the latest versions of Windows, the "Device Manager" in Control Panel allows you to easily roll back to the previous version of the driver. To this end, find the device in question in the "Device Manager," right-click it, select "Properties" and then the "Driver" tab:
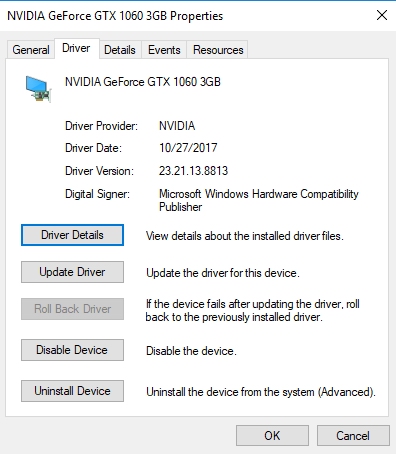
Press the "Roll Back Driver" button. If it is disabled, then you can use the Windows Restore function. If installation of some driver fails in Driver Booster, then find this driver on the Internet yourself (using a search engine or the manufacturer's website), and update the driver using the "Device Manger" in the Control Panel manually as follows. Unzip the downloaded file and install the driver either by clicking something like an "install.exe" file or by selecting the driver's folder manually from the "Device Manager" interface:

right-click, select "Update the driver software," and click "Browse my computer for driver software":
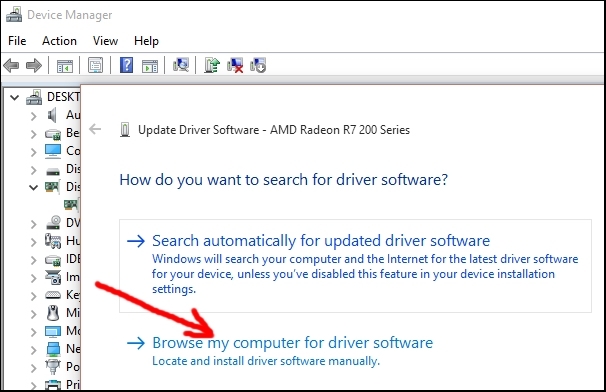
Select the folder containing the driver. After that, Windows will recognize the new driver and install it itself.
I do not recommend other driver updating programs because they are either much harder to use or because they do not offer you the option to install only certified drivers. Driver Booster should be enough for all your driver needs. After you reach a stable Windows configuration and disable Windows Updates, you can stop updating drivers too.
Sometimes, a driver specifically designed for your version of Windows is not available, and Driver Booster will install a generic Windows driver, often from a manufacturer other than the maker of your device, as recommended by Microsoft. In the event that this device starts acting up, you can try installing a driver for the version of Windows immediately preceding yours, instead of the generic driver. If that doesn't help, then you have to wait until the maker of your device develops a driver for your version of Windows or you will have to buy a new device that is compatible with your version of Windows. This is why I said earlier that it is best to wait for at least a year before installing a newly released version of Windows.
When you see a blue screen of death, i.e., a blue screen event, on a regular basis, it is usually not difficult to figure out which application is causing the problem.
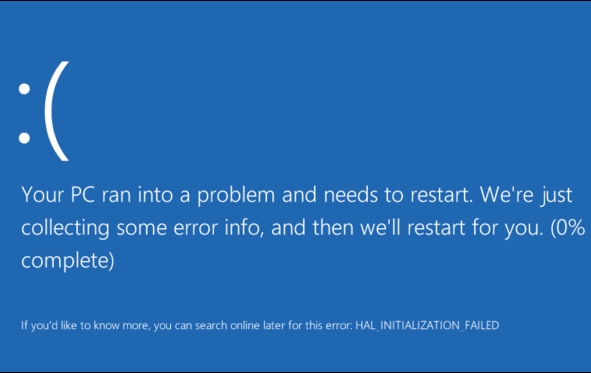
In the screenshot above, the blue screen does not give you an exact reason for the crash, but sometimes it can, for example: SYSTEM_THREAD_EXCEPTION_NOT_HANDLED (dxgmms2.sys). Write down the error message and use your search engine to investigate. In this case, the investigation will reveal that dxgmms2.sys is a Microsoft driver for the DirectX technology, which has to do with video. Therefore, there may be problems with the driver of your video card. If you installed a beta driver recently, this means that you need to uninstall it and install the latest officially released driver. (A more thorough approach to the investigation is described below.)
First of all, minimize the number of simultaneously plugged-in peripheral devices to make Windows stabler. For example, if you have three internal hard drives, a webcam, a printer, and an external hard drive constantly plugged into your computer, you should remove one internal hard drive and unplug all those peripherals; hook them up only when you use them. In addition, it is important to have an uninterrupted power supply for your computer. If your computer is shut down abruptly because of a power failure, then your Windows installation is slightly but irreversibly damaged, and these problems accumulate each time the computer is shut down incorrectly.
The latest versions of Windows usually provide detailed information in a blue screen along with a QR code that you can photograph with your smartphone. In case you can identify a reliable pattern behind blue screen events, for example, they happen each time you try to install Unlocker in Windows 10, this means that the software in question is incompatible with your version of Windows. Perhaps Windows started to crash after you installed some buggy or old software or if you uninstalled it incorrectly. Therefore, you need to uninstall the outdated software properly (e.g., using a free tool called IOBit Uninstaller) and try to find an up-to-date version.
If you have Windows 10 and the latest powerful microprocessor, e.g., Intel Core i7-7700K, then you can prevent most blue screen events by installing plenty of RAM (random access memory), say 8 to 16 GB, by setting the memory dump size above the size of RAM (see below), and by enabling the hibernation function. If you do so, Windows 10 will usually recover from a serious failure (when you have to reboot the hard way, by pressing the power button on the computer) and will pretend that the failure did not happen: you won't find a record of the Windows crash in either Windows Reliability Monitor or Event Viewer. Namely, after you attempt to reboot, Windows 10 will load the latest state of your system (all the programs that you had running and all the documents that you had open) as if Windows simply came out of sleep or standby. It is possible that Windows 8.1 behaves in a similar way.
To enable this behavior, you need to make sure that the next time Windows crashes it saves a complete memory dump as C:\Windows\MEMORY.DMP. Go to the Control Panel → System → Advanced system settings:
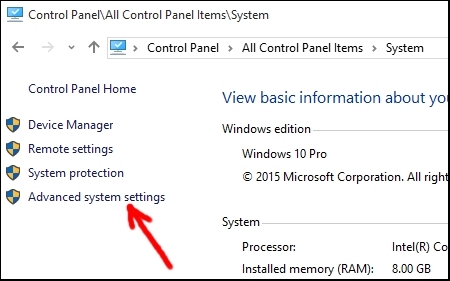
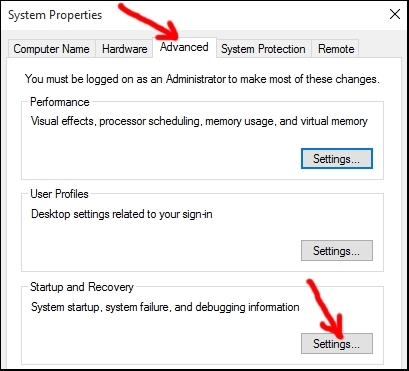
Select the "Advanced" tab and click "Settings" in the section "Startup and Recovery":
In the dialog window that opens, make sure you have the following settings (or similar) in the section "System failure":
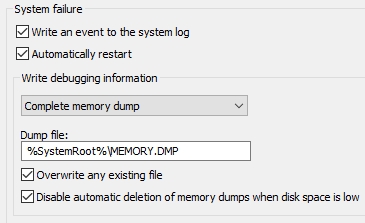
Click "OK" to return to the "Advanced" tab. Next, we need to make certain that the paging file size is managed by Windows or that this size is bigger than the size of RAM. Otherwise your computer will not save a complete memory dump after a blue screen event. Click "Settings" in the "Performance" section:
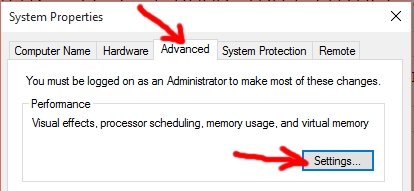
After that, select the "Advanced" tab and click "Change" in the "Virtual memory" section:

In the new dialog window, make sure there is a check mark next to the phrase "Automatically manage paging file size for all drives." Alternatively, you need to manually set the size of the paging file on drive C to the value greater than the size of RAM. You need to remove the paging files (if there are any) from other drives; set their size to zero. You can see the amount of RAM installed on your computer by going to the Control Panel and selecting "System." Look at the line that says "Installed memory (RAM)." While you're in Advanced System Settings, it's a good idea to give priority to various system processes over programs. This change should make your Windows a little stabler and will make the mouse and keyboard more responsive. In the "System Properties" dialog window, change processor scheduling by pressing the "Settings" button:

In the new dialog window, select the radio button "Background services":
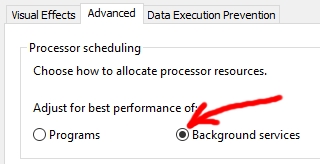
Click "OK" several times to close all settings windows. The hibernation function is usually enabled by default in the latest versions of Windows. If it is, then there should be a hidden system file on your C drive by the name hiberfil.sys. This file is usually quite big, 40% to 75% of your RAM, but the hibernation function offers many benefits, and I recommend keeping it on. Aside from increased stability of the system as described above, hibernation dramatically shortens the time that Windows takes to start and reboot. To disable hibernation (the file hiberfil.sys will disappear), start Windows Command Prompt as Admin, type the following command, and press the Enter key:
powercfg.exe /hibernate off
To enable hibernation, run the following command:
powercfg.exe /hibernate on
Going back to blue screen events, they typically occur with system utilities, such as disk partition managers, Windows diagnostics, encryption tools, file unlockers, Windows interface tweakers (e.g., WindowBlinds), etc. If you cannot figure out which program or driver is causing your Windows to fail, then you can try a free tool called BlueScreenView, which can be downloaded from download.com. Before you can use BlueScreenView, you need to ensure that Windows is saving crash information each time it throws a blue screen. We did so above by enabling a complete memory dump. If you are short on space on your drive C, then you can save a minidump (not recommended normally) instead of the complete memory dump. Go to the Control Panel → System → Advanced system settings:

After that, select the "Advanced" tab and click "Settings" in the section "Startup and Recovery":

In the dialog window that opens, make sure you have the following settings (or similar) in the section "System failure":
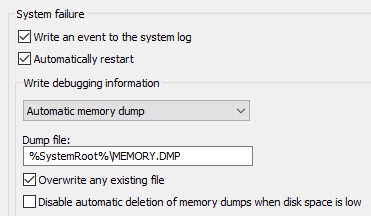
Click "OK". Now install and launch BlueScreenView. Click "OK" if you see a User Account Control dialog:

In the upper part of the BlueScreenView window, you will see a list of blue screen events:

If there are no records there, this means that there are no recorded memory dumps, and you will have to wait until the next crash to investigate. (In the preceding paragraphs, we instructed Windows to save a memory dump during a crash.) If you do see some events in BlueScreenView, click on the one that you are interested in (judging by the date and time) and look at the lower half of the program window. It will show the list of Windows processes and drivers that were active at the time of the crash, and usually, the culprit will be highlighted in red:
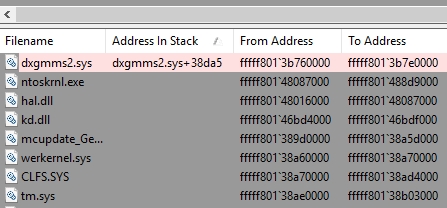
Type the name of the culprit into your search engine and find out what it is. In case this is a device driver, this means that you need to update this driver as described in the previous chapter, or, if the current driver is a beta version, then you need to downgrade the driver to the latest official release.
Let's say you did the name search, and it showed that the name corresponds to a Windows process, such as ntoskrnl.exe. Because you ran System File Check and DISM/Readiness Tool recently, it is unlikely that this system file is damaged. More likely, the crash happened while ntoskrnl.exe was working with some third-party driver or software. To identify this third-party culprit, we need to use a Windows tool called WinDbg (Windows Debugger). First, download the software package "Windows Software Development Kit" (SDK) that corresponds to your operating system:
Windows 7 (SDK for Win8 below should also work):
http://www.microsoft.com/en-us/download/details.aspx?id=3138
Windows 8.1:
https://msdn.microsoft.com/en-US/windows/desktop/bg162891
Windows 10:
https://dev.windows.com/en-us/downloads/windows-10-sdk
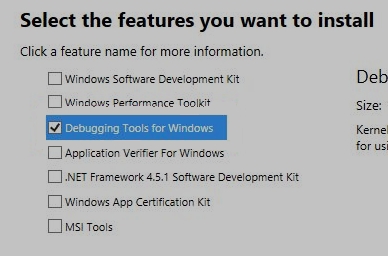
After you launch the downloaded installer, it will offer you a selection of features to install. Select only "Debugging Tools for Windows" and uncheck all other options:
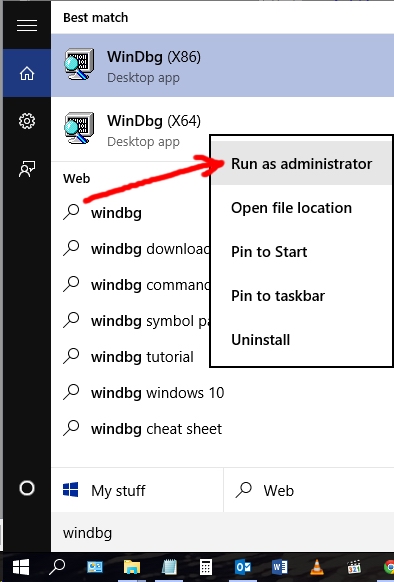
Click "Install." After the installation is finished, press the Windows key and type "WinDbg" (without quotes; in older versions of Windows, you will have to launch the "Run" utility [Start button → Programs → Accessories] as administrator and type "WinDbg"). Right-click WinDbgX64 if you have 64-bit Windows (or WinDbgX86 if 32-bit) and select "Run as administrator":
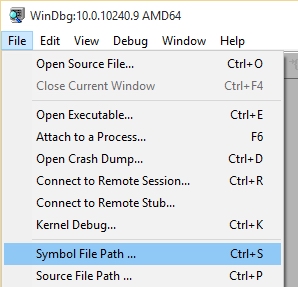
Click "Yes" if you see a User Account Control warning. The program window of Windows Debugger will appear. In the "File" menu, select "Symbol File Path ...":
Into the text box that will appear, copy and paste the following code:
SRV*C:\Windows\symbol_cache*http://msdl.microsoft.com/download/symbols
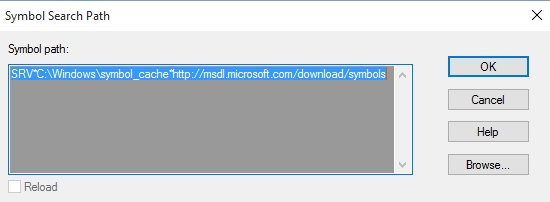
(Note that Kindle for PC will add a trailer to the copied text and may insert spaces into the code at random locations.) Click "OK." Click the "File" menu and select "Save Workspace." Click the "File" menu again and select "Open crash dump..." Browse to and select either the file C:\Windows\MEMORY.DMP or, if it doesn't exist, select one of the files in the directory C:\Windows\Minidump and then click "Open." Windows Debugger will start analyzing the data (and it needs an active internet connection). The whole process will take 10–30 seconds. At the bottom of the text output you will see a phrase: "Probably caused by ..." Now you can use the name of this process or driver to investigate the crash further. If you wish to see a more detailed analysis (for advanced techies only), then click the link !analyze -v several lines above the phrase "Probably caused by ..." in Windows Debugger's output.
If you see the message "Probably caused by Unknown_Image (ANALYSIS_INCONCLUSIVE)" then you need to make sure that Windows saves a complete memory dump next time, as described at the beginning of this chapter. Next time you see the blue screen of death, you can analyze the complete memory dump located at C:\Windows\MEMORY.DMP by means of Windows Debugger.
I wish I could say that Windows is becoming more stable with each new version. It's not. A newly released operating system (e.g., Windows 10 on July 29, 2015: official launch date) is especially vulnerable during the first months because it has not yet been tested thoroughly by Microsoft. So-called feature updates of Windows 10 and insider builds of Windows 10 are less stable and reliable than the previous stable build of Windows 10.
When your computer freezes on a regular basis, i.e., stops responding, even when you press Ctrl+Alt+Del repeatedly, it is usually not difficult to figure out which application is responsible. If you can identify a reliable pattern behind the freeze events, for example, they happen when you download several active torrents at the same time, this means that the software in question is too stressful for Windows. We will discuss how to deal with this problem at the end of this chapter. First, we will review more common causes of freezing.
Freeze events typically occur when you run too many applications at the same time, and these applications use a lot of random-access memory (RAM) and processing power. In case your computer has only 1 or 2 gigabytes of RAM, this is not good. Whatever Microsoft says about system requirements, my sincere belief is that each new version of Windows requires a better microprocessor (CPU), more RAM, a better video card, or all of the above. 2 GB of RAM is the bare minimum; 4 GB is better. If your Windows is 64 bits, then you can upgrade your RAM to 8 GB: even better. Upgrading RAM is the most basic step that you can take to prevent freezing. Read the packing list that you got when you purchased your computer and find out the exact name of your RAM modules (model and manufacturer). Alternatively, use a free program called Speccy to analyze your hardware. You need to buy the same type of RAM for your upgrade. If you never disassembled a computer, then my advice is to ask the computer store to install your additional RAM modules, otherwise you may damage something inside the computer. If you still want to do it yourself, then do a search on the Internet "how to install RAM."
If you have plenty of RAM, then enabling a complete memory dump along with the hibernation function will make your Windows much stabler. These procedures are described at the beginning of the chapter about blue screen events.
Another common reason for freezes is damaged system files, and you can fix this problem by running CHKDSK, System File Check, and DISM/Readiness Tool in that order as described at the beginning of this book. Paradoxically, system files can be damaged by your antivirus software because it scans these files repeatedly, possibly every day, depending on the settings. (This is especially true if your Windows is installed on a traditional rotary hard disk rather than a solid-state drive. We will talk about solid-state drives in a later chapter.) My advice is to change the settings of your antivirus so that it does not scan Windows system files more often than once a month.
The antivirus may also be stifling your operating system if the protection settings are too restrictive. For example, the antivirus may be set to scan every launched program and to monitor all activity and all changes to the operating system. In the settings of your antivirus, try excluding trusted programs from scanning, and I recommend turning off these two options (temporarily, for a test period): real-time monitoring of all activity and monitoring of changes to the operating system. The reason is that Windows is too complex, and the antivirus developers may not know all the details of how to safely deal with the latest version of Windows. People writing the antivirus software cannot know all the intricacies of Windows. If you turn off these two options, then your Windows may or may not become more stable.
These changes will not jeopardize your computer if you scan all external documents and set the antivirus to monitor all web traffic and web browsers. Keep in mind that in Windows, only three web browsers are safe to use with all kinds of websites: Microsoft Edge, Internet Explorer, and Google Chrome. Mozilla Firefox is safe only if it is monitored by a high-quality antivirus software. Make sure that your antivirus successfully installs its extension (or add-on) into your web browser. Also schedule a basic antivirus scan of your computer once a month. If your antivirus has the option for exporting all settings to a file, then save all your antivirus settings in this manner, so that you can easily restore them when you reinstall the antivirus or buy a new computer.
Yet another common cause of freezing is third-party software that manages disk partitions or other third-party system utilities (e.g., Windows diagnostic tools). Many users of tenforums.com have reported that Windows 10 stopped freezing after they uninstalled Acronis True Image. Therefore, try uninstalling all these third-party tools and then reinstalling them one-by-one and see what happens. I do not believe that you need such tools, especially if they constantly run processes and services in the background. I don't use any third-party system utilities aside from CCleaner. If you did all of the above and still cannot figure out the reason for freezing, then you can conduct a little investigation as follows.
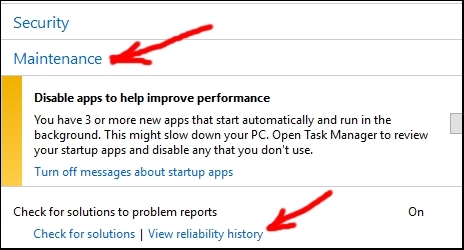
After your computer froze, hold down the Ctrl key, then hold down the Alt key, and press the Del key. If the Windows Lock Screen does not appear, even after you press Ctrl+Alt+Del repeatedly, then your only option is to reboot the hard way: by pressing the power or reset button on the computer. After the computer reboots, go to the Control panel → Security and Maintenance → Maintenance → "View reliability history":
This is the Windows Reliability Monitor (available in Windows 8.1 and 10). Click on the date of the crash in the graph, and under "critical events," you will find the event "Windows was not properly shut down":
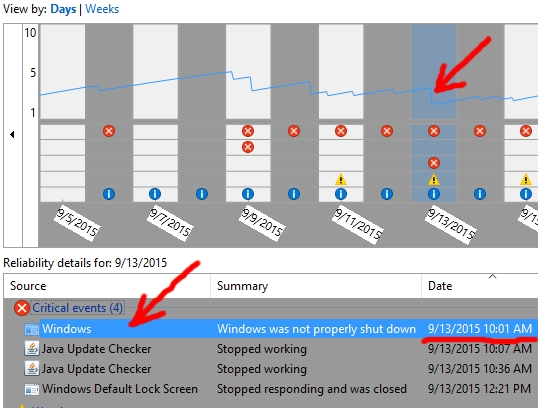
You can review other events immediately preceding the Windows failure. In the case shown above, there are no obvious problems that preceded the freeze. Therefore, we want more details. Double-click the event in question: perhaps there is some useful information there. If not, then take a note of the time and date of the Windows crash, and then go to the Control Panel → Administrative tools → Event Viewer:
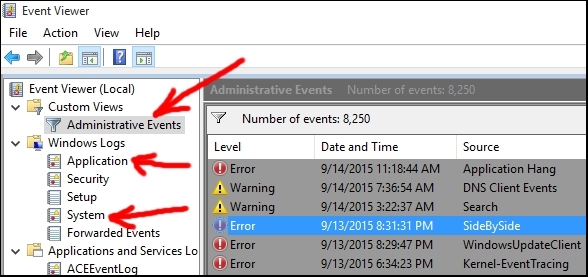
Review various events preceding the Windows crash under study: take a look at Administrative Events (under "Custom Views") and Application and System events (under "Windows Logs"). Click on an event and then read the description in the panel below:
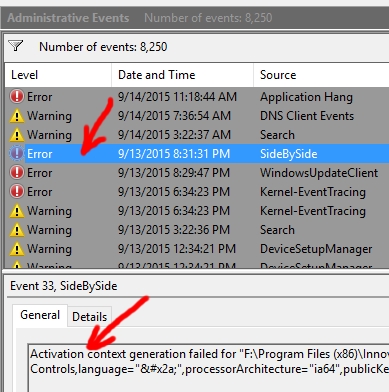
In this case, I was unable to find anything relevant to the crash of September 13, 2015, 10:01 AM. That's OK, better luck next time. You need to get used to the idea that occasional crashes for no apparent reason will happen. No operating system is perfect (certainly not Mac or Linux). The best you can do is to configure your system and hardware in the best possible way in order to reduce the frequency of crashes.
I will now describe how to make a particular software application more stable, when you run many programs simultaneously. Let's say you are working in Microsoft Word for several hours and simultaneously keep running several other programs, which you are using occasionally during this period: Microsoft Outlook, a timer, a media player (playing quiet music), and a web browser. All these programs are competing for your computer's microprocessor. If all of them are treated equally by the microprocessor, then your experience in Microsoft Word will be quite jerky: once a minute or so, Word will be unresponsive for a second or a fraction of a second, gradually getting on your nerves. You can change the priority of these running programs, so that the microprocessor gives preference to Word and works with the other programs only when Word does not need the microprocessor. In other words, Word can always cut the line in front of all other programs that want to use the microprocessor.
To implement this state of affairs, press Ctrl+Alt+Del and click "Task Manger." Go to the tab "Details":
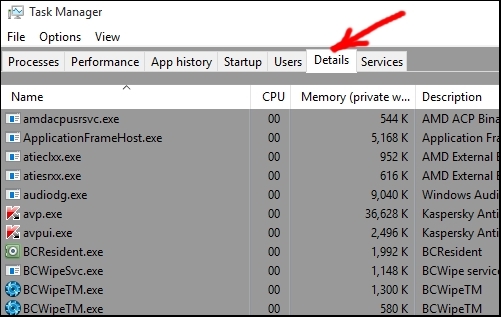
Take a look at the table. In case you do not see the column "Priority" or "Base Priority," then right-click any of the column headings and select the option "Select columns":
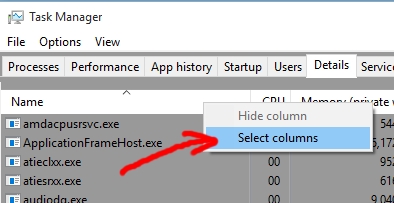
In the dialog box that will appear, find the option "Base priority" or "Priority" and place a checkmark next to it:
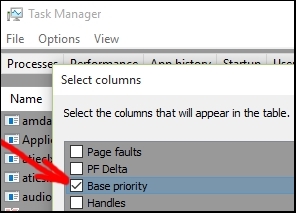
Click "OK." In the Task Manager, you can rearrange the columns by dragging and dropping a column heading. Now scroll down through the table and find the process of Microsoft Word, it is called winword.exe:

You can see that Word has normal (average) priority. That's the way we want it. No program should have above-average priority because otherwise it will start messing with Windows processes and may bring down the whole operating system. You may notice that two Windows processes nearby, wininit.exe and winlogon.exe, have high priority. You should never change priority of system processes, such as these two, if you want your Windows to be stable. Now we will find the less important programs and lower their priority so that they do not get in the way of Word. I right-clicked the media player process (winamp.exe), selected "Set priority," and clicked "Low":
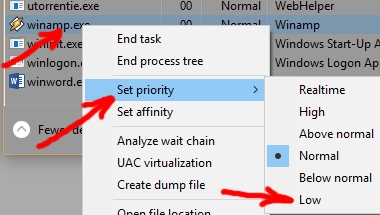
In a similar fashion, I will set priority to "Low" for outlook.exe, for the timer process (ct.exe, program "Cool timer"), and for chrome.exe (several Google Chrome processes). Now Microsoft Word will work smoothly and will be more stable during this multitasking session. The flip side of the coin is that the programs with low priority may become less stable (in most cases, they will be OK). In general, when a program stops responding and you cannot shut it down, you can resort to the Task Manager. Under the tab "Details" or "Processes," find the process in question, right-click it, and select "End task."
In conclusion, if you know that some software that uses a lot of system resources (CPU, RAM, network, etc.) often causes your computer to freeze, then you can try confining this program to one of your microprocessor's cores, to prevent the program from clashing with Windows and other active programs. Modern PCs typically have a microprocessor that contains several "cores," i.e., smaller microprocessors. You can find out the structure of your microprocessor in the Task Manager. Hold down the Ctrl key, hold down the Alt key, and press the Del key, then select "Task Manager" and click the "Performance" tab:
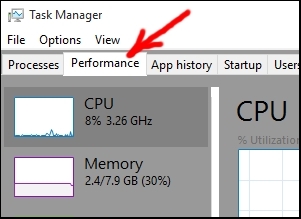
In the lower right-hand corner of the program window, you will see the description of your microprocessor:
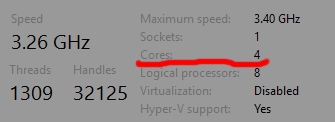
My microprocessor (shown above) contains four cores (four separate smaller microprocessors) and eight logical processors, meaning that Windows uses each of the four cores as if it were two separate microprocessors. We need to confine the problem program to one of the cores and to confine other programs that you are using (those that do not cause problems) to other cores. This task can be accomplished in Task Manager, by changing so-called process affinity. Go to the "Details" tab:

and right-click the process that regularly causes your Windows to freeze, then select "Set affinity":
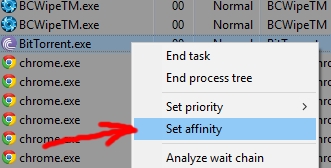
In my case, I know that Windows reliably freezes when I use a torrent client, such as BitTorrent or Vuze, to download an active torrent (i.e., with thousands of seeds), if I simultaneously use some other taxing program such as Word, a video player, or a graphics editor. I checked the drivers for my network adapter, and it turned out that I have the latest available official driver (nothing to be done here). Thus, I am going to confine the process BitTorrent.exe to the last core of my microprocessor. In the dialog that opens next, I will uncheck <All processors> and place a checkmark next to the last two processors (number 6 and number 7):
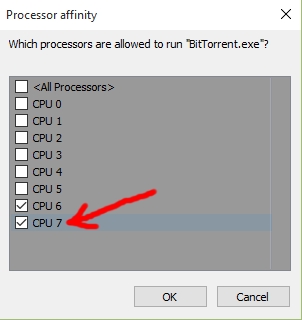
I will click "OK." I am assuming that CPU 6 and CPU 7 constitute Core #4 of my microprocessor. My observations suggest that Windows most actively uses CPUs 0 and 1, and to a lesser extent CPUs 2 and 3. Now that the troublemaker is isolated and does not bump heads with Windows and other active software on my computer, Windows will be much less likely to freeze. You don't need to change priority of the problem process: my advice is to leave it "Normal."
I later resolved this problem with torrents by installing a powerful network adapter and using it instead of the one that is built into my motherboard. (Changing affinity is no longer necessary.) To give another example, let's say your computer usually freezes when you use Skype for video calls. In this case, you can think about the driver for your video adapter (check if a new official driver is available or uninstall a beta driver), and you can confine Skype to the last core of your microprocessor whenever you use this program.
The most popular antivirus programs typically focus on viruses and do not detect other undesirable software such as adware very well. Adware programs are designed to display ads and to redirect your web browser to various commercial websites. Adware programs usually get installed while you are browsing questionable websites or when you install free programs that contain bundled adware and spyware programs. Adware programs insert themselves into the startup list of programs in Windows: the list of programs that are launched when Windows boots. These annoying programs also hijack and clog up your web browsers, slowing them down and forcing you to see ads or websites that you don't want to see.
There are several ways to get rid of adware, and when you do, your computer and web browsers will start up and work much faster. The first step is to go to the Control Panel → "Programs and Features" and to review all installed programs there. Uninstall any programs that you do not need and investigate any suspicious programs by searching the Internet. In the future, whenever you install any software, especially free software (freeware), always select the option "Custom installation" or "Customize" because if you select the default installation, it will often include installation of some adware or a browser add-on.
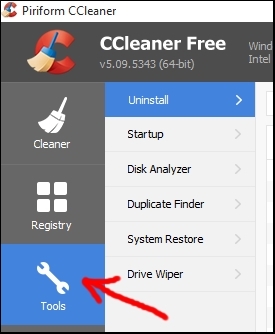
The second step is to download CCleaner (a free program) from its own website or from Download.com. CCleaner will help you to clean up the Windows startup list and to clear web browsers of any parasitic add-ons. After you install CCleaner, launch it, select the "Tools" menu:
and the "Startup" menu:
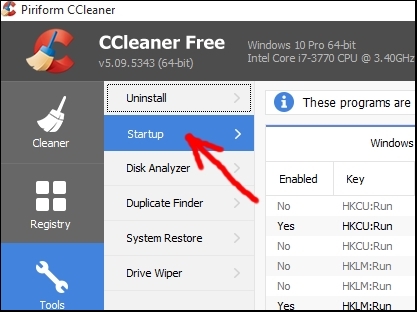
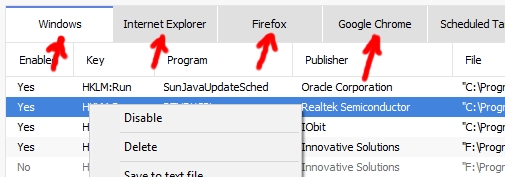
Browse the various installed components under the various tabs there and disable the ones that you don't need or investigate suspicious programs on the Internet:
After you finish this process, select the "Cleaner" menu on the left-hand panel:
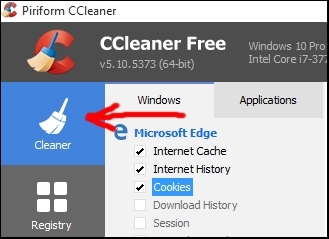
and clean up unnecessary files on your computer. Carefully review various options there before launching the cleaning function:
Do not clean the Windows registry in the "Registry" menu of CCleaner:
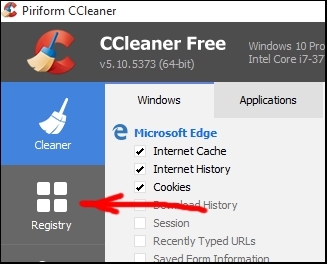
because there is little to be gained from this action, but the risks are serious. In general, you should never ever use any kind of registry cleaning programs because they can mess up your Windows. CCleaner is probably the only exception because it performs a shallow and conservative cleaning of the Windows registry. Still, you do not need to do this.
If your version of CCleaner allows, I recommend the following settings for complete deletion of all traces of your activities (even law enforcement agencies won't be able to restore them):
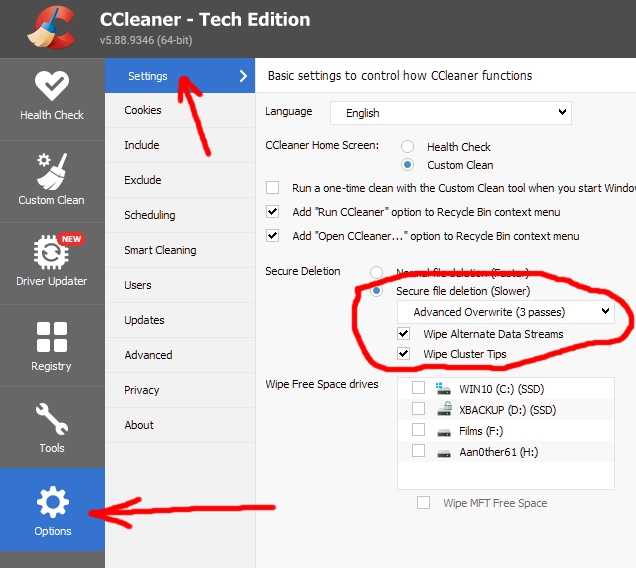
Do not choose the "clear history on exit" option in your browser's settings, let CCleaner shred these data. Choose open-source web browsers such as Firefox and Brave. Vary the size of the browser window occasionally because websites can identify you by the size and position of the browser window on your desktop. The next step is to review Windows Services. Press the Windows key and type "msconfig" (without quotes). Right-click "System Configuration" and select "Run as administrator":

(On older computers, you need to go to the Control Panel → Administrative tools, then right click "System configuration" and select "Run as administrator.") After that, select the "Services tab" and select the option "Hide Microsoft services":
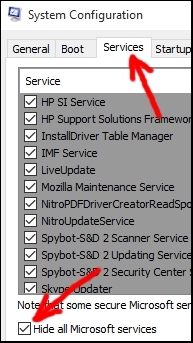
To disable a suspicious or unnecessary service, remove the checkmark next to it, and then click "OK". This program may ask you to restart Windows to implement the changes. You need to be careful, and I recommend not disabling any service unless it is of suspicious origin. Read the description of each service and do some investigation on the Internet. Then disable services that you believe to be spyware- or adware-related, but do not disable services of legitimate programs.
Finally, try some antispyware programs, such as AdAware, Spybot – Search and Destroy, IOBit Malware Fighter, and YAC. One by one, install them, run a quick scan of your system (not the full scan), then uninstall and try the next program. Two or three antispyware programs will be sufficient, and you can keep one of them installed permanently.
Regarding antivirus programs, my advice is to avoid free antiviruses because they are not very effective and can let you down. I learned the hard way to never trust free antiviruses. Therefore, it is best to install a reputable paid antivirus program and configure it as described in the chapter "Investigate freeze events."
There are many things that can go wrong with a computer, including viruses, hardware failure, bugs in software, accidental damage, a house fire, flooding, etc. Therefore, it's a good idea to back up all your data (work-related and personal documents, pictures, e-mail, and other important data) on a USB drive or on a network, for example, once a week. Furthermore, I recommend saving all key documents on an optical medium, such as DVD, once a year. Such media are much more durable than hard drives, which lose approximately 1% of stored information per year. It is also useful to create a recovery disc or recovery drive for Windows for situations when Windows fails to start for some reason (e.g., a virus or a surface defect in the hard drive). The recovery disc can help you start your Windows, preserving your installed applications and all settings. This chapter describes the relevant methods.
Everyone has secrets and deeply personal documents, which ideally will never be seen by another living soul. There are several ways to encrypt or password-protect your data (few of them are free, unfortunately):
Remember that safety of your private data depends on the strength of your password. Ideally, the password should be at least 8 characters long and contain both uppercase and lowercase letters, numbers, and special characters ($ # * @ etc.). Now that we covered encryption technologies, it's time to talk about the ways to back up your files.
The most typical backup procedure involves "synchronizing" two folders: one on your computer (contains the latest data) and one on some external device (e.g., a USB drive): the latter folder has the same name and mostly the same contents, except that it's an older version of your files, which you created some time ago by copying. For example, you have a folder "My Files" on your computer, which you need to synchronize with the folder "My Files" (one week old) on your USB drive so that the backup folder contains fully updated files and subfolders. The synchronization makes the two folders identical, but involves much less work than simple copying because synchronization will not touch the vast majority of files that remained unchanged. Only outdated files will be replaced and only new files will be copied. Deleted files and subfolders will also be deleted in the backup folder during the synchronization.
Unfortunately, there are not many free synchronization programs that are up to date, and the tools built into Windows are not very user-friendly. I will describe two Windows tools for copying and synchronization of files: RichCopy and Robocopy. I chose them because they are free and reliable and because they allow you to work with EFS-encrypted files. First, create a task or calendar appointment in Microsoft Outlook (or a similar application) that recurs once a week and prompts you to back up your data on a USB drive.
RichCopy is a convenient application with a graphical user interface that was written by a Microsoft engineer. Let's say you are synchronizing a source folder (EFS-encrypted) with a backup folder (on your USB drive, you want it unencrypted). The advantage of RichCopy is that it allows you to remove EFS encryption from the copies of your files in the backup folder. The disadvantage of RichCopy is that it does not delete empty subfolders in the backup folder (but it does delete the files that are absent in the source folder).
The second application, Robocopy, is a command line tool of Windows, i.e., you need to type commands and parameters by hand into Windows Command Prompt.
The advantage of Robocopy is that it is very reliable and will delete all empty subfolders from the backup folder during synchronization. The disadvantages are the absence of a graphical user interface and inability to remove EFS encryption. In this regard, Robocopy and RichCopy are complementary.
Please don't be scared of the command line interface. It is easy to understand (I will do my best to explain it), and once you execute your first command, you can simply copy and paste the commands later (no need to retype them by hand). Let's review several synchronization scenarios.
In this case, you can use Robocopy alone. Let's say you decided to back up your files once a week. A week ago, you copied the folder D:\My Files to your USB drive (F:\My Files), and today you want to synchronize these two folders, because during the past week, you added some documents into that folder and modified some files there too. Close all programs that have active access to the files to be synchronized (including Windows Explorer, a.k.a. File Explorer) because Robocopy cannot work on opened files and folders. Next, press the Windows key and type "cmd" (without quotes). In older versions of Windows, find a program called "Windows Command Prompt" (Start button → Programs → Accessories). Right-click the shortcut of Windows Command Prompt:

and select "Run as administrator." If a "User Account Control" dialog appears, click "Yes":

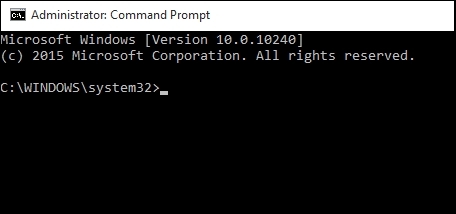
The Command Prompt window will appear, waiting for your instructions:

First, we will save the simple code for Robocopy in a text file, so that you won't have to retype it in the future. Create a plain text file (.txt) with the name "Backup Command Line" using Notepad and then type the following code into the file (or copy from this ebook):
robocopy "D:\My Files" "F:\My Files" /XO /S /PURGE
For your convenience, I underlined the source folder and made the backup folder bold and italic (you don't need this formatting in Notepad). This command uses the program "robocopy" to synchronize the backup folder F:\My Files with the source folder D:\My Files. As you guessed, the files are copied from left to right, i.e., from D:\My Files to F:\My Files. (Replace the names of the source and backup folder with your actual folder names.) The parameter /XO instructs Robocopy to copy only new and updated files (whose "Date modified" is later in the source folder). The parameter /S instructs Robocopy to process all subfolders, and parameter /PURGE means that all files and subfolders that are present only in the backup folder will be deleted. As a result, after the synchronization, the source folder and backup folder will have an identical set of subfolders and will contain identical files. (Here we are not comparing the contents of the files, we compare only "Date modified." Different "dates modified" usually mean different contents.) Copy the command line and save the text file where you can find it later. Next, right-click at the cursor in the Command Prompt window and select "Paste" (in Windows 10, right-clicking causes pasting):

Press the "Enter" key to execute this script. If you have lots of files, Robocopy will be busy for a few minutes, outputting large amounts of text. In the end, you will see something like the following report:
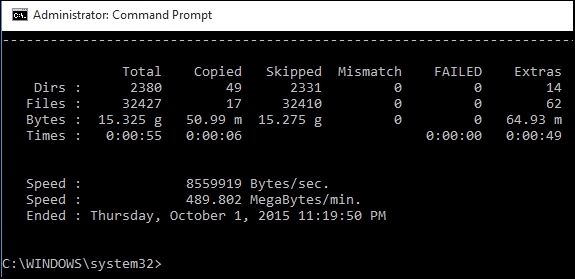
where "Dirs" means subfolders (directories), and "Extras" means files and subfolders that were present only the backup folder and were therefore deleted. We successfully backed up all data. In case you get some error messages with Robocopy, then use your search engine to find a solution. Close Command Prompt. A week from now, your calendar software will remind you to back up your files, and you will insert the USB drive, launch Command Prompt, copy and paste the command line, and synchronize all files again. Let's take a look at another scenario.
For example, you have a BitLocker drive on your computer and a BitLocker drive on a USB drive or on an external hard disk. In this case, you can use the same procedure as in the preceding chapter: Robocopy alone will do the job.
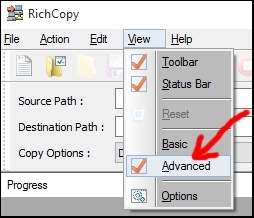
For example, you have EFS-encrypted files on your computer (have green names) that you need to synchronize with files on an external drive, so that the EFS encryption is removed during the copying (the backup files are no longer "green"). In this case, we will need both RichCopy and Robocopy, in that order. RichCopy will remove encryption and Robocopy will clean up the backup folder. Download and install RichCopy. Launch RichCopy as an administrator, and if a "User Account Control" dialog appears, click "Yes." Go to the menu "View" and select "Advanced":
Now click the "Source(1)" button and navigate to the source folder:
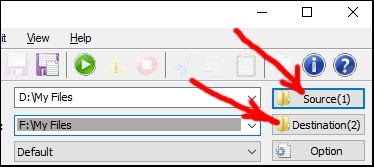
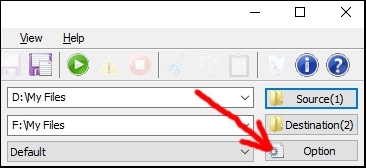
Then click the "Destination(2)" button and navigate to the backup folder. Next, press the "Option" button:
In the window that appears, select the options "Purge" and "Verify":
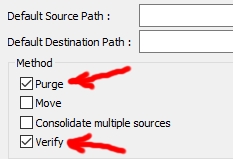
and leave everything else as is. In the left-hand panel, select "File attributes, Error Handling":
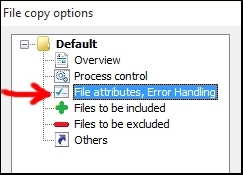
In the new view, select the option "File attributes to remove – Encrypted":
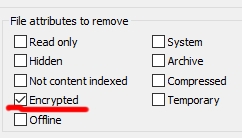
Do not change anything else there. Click "OK" at the bottom to close the "File copy options" window. Press the button "Save copy option to a file":
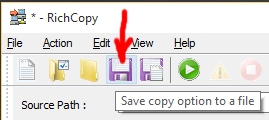
After you save the settings to an .rcx file, you won't have to configure them again in the future. The last saved settings will still be loaded when you launch RichCopy next time. If not, then select menu "File" → "Open" to load the previously saved settings file, or select "File" → "Recent Profiles":
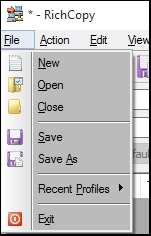
We are ready for synchronization. Make sure that the files to be synchronized are not opened in any software because RichCopy cannot work with opened files. Now press the "Start copy" button:

If everything goes well, you will see a message to this effect in the lower panel of RichCopy. (If you get some error messages, then use your search engine to find a solution.) Now, we will use Robocopy to do the cleanup. Close RichCopy and any programs that are accessing the files and folders to be synchronized (including Windows Explorer). Press the Windows key and type "cmd" (without quotes). Right-click the shortcut of Windows Command Prompt:

and select "Run as administrator." The Command Prompt window will appear, waiting for your instructions:

Type the following code (or copy from this ebook):
robocopy "D:\My Files" "F:\My Files" /PURGE /S /NoDCopy
You are already familiar with this command (replace the names of the source and backup folder with your own folder names). The parameter /NoDCopy instructs Robocopy to not copy special attributes, such as "Encrypted" or "Hidden," to the files and subfolders in the backup folder. At this point, the two directories are already synchronized, but RichCopy did not delete empty subfolders in the backup folder. The code shown above will do this job. Save this code in a text file for the next week's backup.
In this scenario, synchronization is impossible. You will have to delete the old backup file and make a new copy.
To prepare for the disastrous event when your Windows cannot start (for example, because of a virus), you need to create a System recovery drive (called "recovery disc" in Windows 7). First, you need an empty USB drive at least 8 GB in size. Second, clear your browsing history and other sensitive personal information using CCleaner. Third, create a System Restore point. Now you can go to the Control Panel → Recovery → "Create a recovery drive"
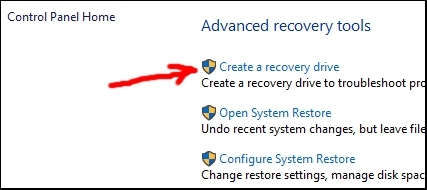
(in Windows 7: Control Panel → Backup & Restore → Create a system repair disc). Follow the instructions on the screen, and you may have to insert Windows installation media, such as a DVD, if the relevant Windows features are not installed. In the event that this procedure asks you to insert the Windows installation DVD and you don't have it, then I recommend this excellent detailed tutorial:
https://www.winhelp.us/restore-windows-re.html
In case you see the message "We can't create the recovery drive. A problem occurred while creating the recovery drive" it probably means that you have an outdated build of your Windows, and therefore you should install the latest Windows updates.
If you fixed all problems with this function of Windows and successfully created the recovery drive, now you need to verify that everything is working fine. Launch Windows Command Prompt as Admin, enter this command: reagentc /boottore
and restart the computer to see what the Windows Recovery Environment looks like. This command works only once, your next reboots will be normal.
If your computer does not start even with the Recovery Drive, which can happen if you hit your PC with some heavy object or if you plug in too many peripheral devices, then you need to do the following: First, disconnect all nonessential peripheral devices and try starting the computer again. If it does not help, then ensure proper grounding (to get rid of static electricity), unplug the computer from the power outlet, put on rubber gloves, open your computer's case, take out the RAM modules, clean the contacts with a Q-tip, and install the RAM modules back. Disconnect and reconnect your video card and all hard drives. Purchase a vacuum cleaner with a reverse flow (which works like a blower) and several different tools (warheads). Install the smallest tool on your vacuum cleaner, put on a respirator, go outside your home or go out on a balcony with the vacuum cleaner and the computer, and remove all dust from inside your PC by means of this blower. Periodically check the temperature of the air flow by hand to make sure that this air is cold. If it gets hot, turn off the vacuum cleaner for 10 minutes, and then continue the procedure with cold air. This approach should revive your PC. If you don't use rubber gloves, then you need to ground yourself every minute to get rid of static electricity during this operation.
The recovery drive may solve some but not all problems with booting of Windows. Sometimes, it will offer you no other choice but to reinstall Windows. For such emergencies, you need to create a clone of your system drive (drive C:) using free version of AOMEI Backupper Standard. This clone should be stored on a different hard drive inside your computer so that you can copy the clone and restore your Windows installation with all programs and settings in the event that your system hard drive stops working. I do not recommend activating a Windows feature called Hyper-V, which AOMEI Backupper Standard may suggest. (This feature allows for copying of the system hard drive while Windows is working as usual.) Hyper-V will make your Windows unstable. Try using AOMEI Backupper Standard without Hyper-V. If this approach does not work, then activate Hyper-V (Control panel → Programs and Features → Turn Windows features on or off), create a clone, and then uninstall Hyper-V. You can periodically create new clones of your system drive in AOMEI Backupper Standard, for example, every 6 months.
Traditionally, the data on a computer are stored on a hard disk; the latter is a magnetized thin disk rotating at high speed:
A similar principle is used in a tape-recorder (because of the magnetic tape) and a record-player. The hard-drive technology is fairly reliable and advanced at this point, but this mechanical writing and reading of data has reached a point where the speed cannot be increased appreciably without making the hard drive bigger. This technology is not 100% reliable either, and occasionally a small part of the disk's surface turns bad (becomes a "bad sector"), thus damaging your data or corrupting Windows files. Therefore, you have to run CHKDSK periodically to find and exclude these bad sectors.
Enter flash memory. This technology is based on semiconductors and does not involve any mechanical process. A hard drive that is based on flash memory (also known as a "solid-state drive") is much faster, smaller, and more reliable than the traditional rotary hard disks. At present, solid-state drives are also far more expensive than the traditional hard drives. For this reason, it makes sense to have two types of hard drives in one computer, namely, to use a solid-state drive (100–200 gigabytes) for Windows files and for key programs, and to use a bigger hard drive (traditional type, 1000–3000 gigabytes) for storage of data and for less important programs.
Windows and programs that are installed on a solid-state drive work several times faster, all else being equal. Although characteristics of your microprocessor are important for your computer's speed, some tasks (e.g., startup of programs and of Windows) are slowed down substantially by the limitations of the traditional hard drives, even if you have a powerful microprocessor. For this reason, when you are buying a new computer, it's a good idea select a model that contains two types of hard drives. If you already have a computer where Windows is installed on a traditional hard disk, then things are a little trickier. Only a tech-savvy person can install a solid-state drive into a traditional computer, without losing programs, settings, and data (and without damaging the hardware inside the computer). You might consider paying a technician at a computer store to do this task for you. While you're at it, also ask him/her to upgrade your RAM to 4–8 GB. If you still wish to do the installation yourself, please consider the following risks. Many free programs whose developers claim to safely copy your system disk (with Windows and all programs and settings), the process known as "cloning a hard drive," are low-quality trash that will damage your Windows installation, forcing you to eventually do clean re-installation of Windows. To give an example, software called MiniTool Partition Wizard Free has an option to copy your system hard drive to a new solid-state drive. In reality, what will happen with Windows 10 is that this program will copy your system hard drive to the solid-state drive and restart the computer with both disks active in your computer. This action will irreversibly damage the Windows 10 installation on both disks, because your computer will get confused about two identical versions of Windows 10. Namely, the System Restore function will no longer work, System File Check will no longer work (you won't be able to repair it), Windows Activation will get screwed up, BitLocker drives will not work, etc. For this reason, if you choose to clone your system hard drive, you need to use only reputable software. I recommend AOMEI Backupper Standard. I do not recommend any Acronis software or any software for resizing hard drive partitions (except for Windows own Disk Management in Computer Management, Administrative tools). Playing with partition resizing is a highly dangerous activity, and bugs in non-Microsoft software will eventually cause a catastrophic failure forcing you to reinstall Windows. When copying the Windows installation to the new solid-state drive, don't forget to BACK UP ALL YOUR DOCUMENTS AND WRITE DOWN ALL THE KEY SETTINGS. In the cloning software, select the option that makes the new disk primary (bootable for the operating system; this option may be called "Copy NT signature") and to remove the old disk before you boot the computer again. To be precise, after cloning, you need to immediately get inside your computer, disconnect and remove the old system hard drive, and to reconnect the new solid-state drive exactly with the connectors and wires of the old system drive inside your computer. After that, if the computer doesn't start, you need to reboot the computer, enter the BIOS (UEFI) settings, and adjust the boot order. In addition, if you are not a tech savvy person, there is a risk that you will damage the hardware inside your computer while trying to install the new solid-state drive. Keeping these risks in mind, see these tutorials:
http://lifehacker.com/5837543/how-to-migrate-to-a-solid-state-drive-without-reinstalling-windows
http://www.youtube.com/watch?v=SFowSc5gOhE
After you install a solid-state drive, you need to make sure that Windows does not move the file pagefile.sys to your traditional (slow) hard disk. This so-called paging file is an extension of random-access memory that resides on your hard drive. Roughly speaking, when Windows runs out of RAM, it starts using the substitute memory (the paging file). You may have guessed that your computer will be slowed down if the paging file is located on the slow mechanical hard drive, especially because such hard drives are periodically turned off by Windows to conserve power (typically after 15 to 30 minutes if inactivity). We will make certain that the paging file resides on the solid-state drive. Go to the Control Panel → System → "Advanced system settings":

Select the "Advanced" tab and click "Settings" in the "Performance" section:

After that, select the "Advanced" tab and click "Change" in the "Virtual memory" section:

In the new dialog window, uncheck the option "Automatically manage paging file size for all drives":
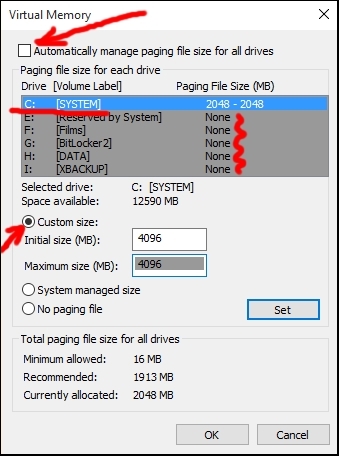
In the same window, also set the radio button to "Custom size" as shown above, then select the system drive (C) and set the size of the paging file to 110–125% of the size of your RAM. Look at your other drives in the list there and set their paging-file size to zero, one by one. I am assuming that your system drive (C) is the solid-state drive and all others are traditional disks. Click "OK" several times to close all dialog windows. The changes will take effect after you restart the computer.
You can verify the result by checking the location and size of the file pagefile.sys. It should be now located on drive C. If you selected a size of your paging file smaller than memory (RAM), then the changes that we just implemented will prevent Windows from saving the whole memory dump after a blue screen event. Now it will be saving only a minidump, in the folder C:\Windows\Minidump, after a crash. The minidump is sufficient for the investigation procedure that we used in an earlier chapter, but not always.
Finally, you will notice that your SSD is running out of free space gradually at the rate of 10–20 GB per year, and it seems that there is nothing you can do because no cleaners (such as CCleaner) can recover that lost space, and Windows' own utility called Disk Cleanup does not help either. The culprit is the hidden directory "AppData" located at C:\Users\[Your_User_Name] in Windows 8/10. This directory can be cleaned up only manually: use the File Explorer to navigate to this hidden folder, then type "size:gigantic" (without quotes) in the search field. Windows will find files larger than 128MB. This manual cleanup can damage a program's installation, in which case you will have to reinstall the program in question. You can use the same strategy to find gigantic files on drive C. Here you have to be extremely careful to not delete any Windows-related or necessary program files. Do some research on the Internet before deleting unfamiliar files.
Another Windows feature that can take up substantial space on drive C is Windows Restore. My advice is to not mess with it and give it enough space: at least 5GB. In case you still need to recover some space on your system hard drive, then go to Control Panel → System → "System Protection" and select the drive being protected. Press the "Configure" button and delete all previous restore points. Create the latest restore point just in case.
In the event that you need to delete the folder "Windows.old" located on your C: drive (this action is not recommended), you will have to use the Disk Cleanup utility. In brief, right-click the C: drive and select Properties → "General" tab → Disk Cleanup → Clean up system files. Don't delete "Device driver packages" there, even if they take up a lot of space. My advice is to get a sizable solid-state drive (200GB or more) and to never delete the folder Windows.old or Windows Restore points. One of the recent Windows 10 updates (October 2017) was screwed up by Microsoft and caused blue screen events at startup. If you had deleted the folder Windows.old, then you would not have been able to boot your computer ever again without a Recovery Drive or reinstallation of Windows.
I will describe how to change the blinding white color of the background in various programs to a color that is easier on the eyes. The second trick will force your computer to stay in the "sleep" or standby mode and to not wake up without your permission. I devised these tweaks myself and posted them on Microsoft's Technet forum and on tenforums.com.
(This section will be useless for Windows 11 users; use a dark theme.) This solution allows you to permanently set the background color in most programs (Notepad, Word, etc.) to gray or some other color, except for Windows Explorer (a.k.a. File Explorer), where the background will stay white (more on that later). I am assuming that you are not using a high-contrast theme of Windows (Control Panel → Display → Customization).
Windows 7 users only: You don't need to edit Windows Registry. Simply go to Control panel → Personalization → (at the bottom) click on "Window colors," and then click on the window background in the picture. Now change the color to gray at the bottom of the dialog window. When you are done, skip ahead to the discussion of Microsoft Word below.
1) Hold down the Windows Key and press the R key (in older versions of Windows, launch the "Run" utility, usually located in the Start menu → Programs → Accessories):

Type "regedit" (without quotes) and press the Enter key. Click "Yes" if you see a User Account Control dialog.
2) Edit the registry in the folder HKEY_CURRENT_USER\Control Panel\Colors
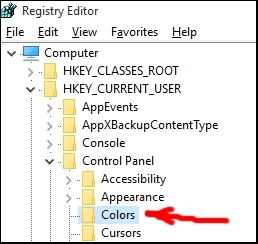
Edit the registry key called "Window"
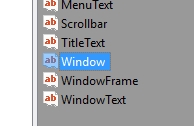
by double-clicking on it and entering "170 170 170" (without quotes). Press "OK":
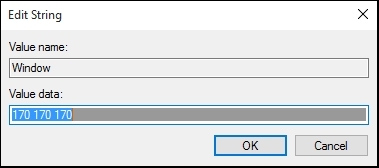
3) Edit the registry at HKEY_LOCAL_MACHINE\SOFTWARE\Microsoft\Windows\CurrentVersion\Themes\DefaultColors\Standard. Double-click the registry key "Window" and set it to 999999 (hexadecimal format):
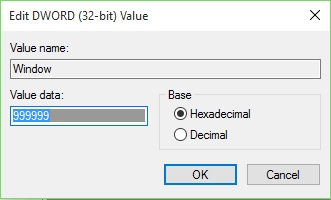
Click "OK." Credit for this useful suggestion goes to David J. Gibson from Microsoft's Technet forums.
4) Close the registry editor and press Ctrl+Alt+Del and then Task Manager to initiate the new theme (don't do anything there). Close the Task Manager. All done.
Unfortunately, one of updates of Microsoft Office 2016 (of August 23, 2016) screwed up the background color settings in Word and other Office applications. As a result, the procedure described above will have no effect on the unpleasant white background in Microsoft Word. The only solution that I could find is to manually change "page color" in each document while you are working on it. Select the "Design" ribbon in Microsoft Word, press the "Page Color" button, and select the gray color:

If you have to send this document later to somebody, and they don't want the gray background, then you will have to remove it by selecting the option "No color":

As for the background color in Windows Explorer (a.k.a. File Explorer), things are more complicated. My advice is to resize the Windows Explorer window (whose background is still white) to reduce the eye irritation. Also reduce the brightness of your monitor. Do not use third-party software to change the background color in Windows Explorer because these software packages are buggy or make Windows unstable (with one exception described below). I tried software applications called WindowBlinds and Xplorer2, which allow you to use various background colors or patterns in Windows Explorer (actually, Xplorer2 is a replacement for Windows Explorer). Both are shareware. I do not recommend these applications because they have too many bugs.
I recently tested another application, an extension for the File Explorer that is called QTTabBar. It does not destabilize either the File Explorer or Windows, but I found one problem: when I connect my Android phone via a USB cable, I cannot use the File Explorer to create or delete folders in the phone while the QTTabBar is enabled. This is not a big deal, and you can still use this add-on. In my opinion, it is the best option for Windows 8 and 10. After you install this program, open the File Explorer, go to the tab "View":
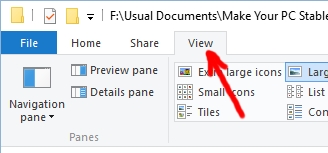
press the button "Options" and select "QT Command Bar":
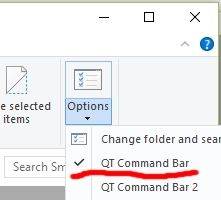
In the toolbar that will appear, press the "Settings" button:
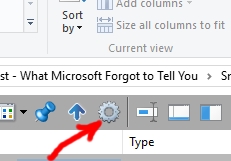
and select the menu "Appearance":
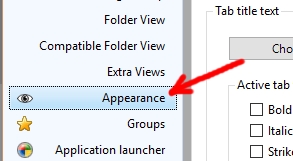
After that, change the appearance of the File Explorer to your liking. I recommend a gray color for all of the following. Namely, select the "Toolbar" tab and set the colors:

Then select the "Folder view" tab and set the background color:
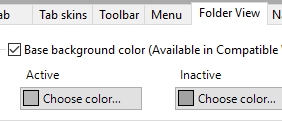
After that, select the tab "Navigation pane" and set the "Back color." Next, select the "Compatible Folder View" menu in the left-hand panel, and set the "Selected column bg color in Details":

Select the menu "Preview" in the left-hand panel and uncheck "Show preview tooltip for text, image, and media files." After that, select the "General" menu and uncheck "Show tooltips":

Click "Apply" at the bottom of the dialog window. Finally, press the "Export now" button:

and save the settings file somewhere. When you reinstall or upgrade QTTabBar, you will be able to easily restore all the settings by importing this file and restarting the File Explorer. Now, click "OK" to close the settings window. Restart the File Explorer. Note that the background of the left-hand navigation pane will be turning white periodically: every time the wallpaper changes on your desktop if you have it set as a slideshow, but this is not a big problem either. You might consider increasing the time interval for changes of the desktop wallpaper (called "background" in personalization settings of Windows 10).
A word of caution: after a major Windows update, such as a service pack, an "anniversary update," or a scheduled "upgrade" to a new build, you will have to reinstall QTTabBar too because otherwise it will start acting up and destabilizing the File Explorer.
It's a good idea to send your computer to the sleep or standby mode for the night instead of shutting down. This is because the process of turning the computer on is stressful to the hardware (a surge of electricity rushes through all the components) and is likely to wear it out gradually. Entry into the sleep or standby mode and the reverse process, wakeup, are less stressful for the hardware and allow you to save electric power when you are not using the computer. The problem is that the latest versions of Windows can't keep the computer asleep and wake it up after a few hours. This problem requires several steps.
1) Edit your BIOS (UEFI) settings: See the end of the chapter about Driver Booster regarding how to access BIOS (UEFI) settings. After you enter BIOS (UEFI) settings successfully, go to advanced power management options (APC, the name may be different for your motherboard) and disable various options such as "Wake on LAN." If you have an option "Deep Sleep" there, enable it (this option allows waking only after the power button is pressed). In "Boot" options of BIOS (UEFI), disable "Fast Boot" for easy access to BIOS (not related to sleep). Exit the BIOS (UEFI) Setup (the option "Exit and Save Settings").
2) If you enabled the "Deep Sleep" option, then go to the Control Panel → Power options → "Change plan settings":
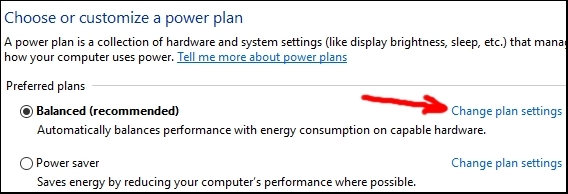
then select "Change advanced power settings":
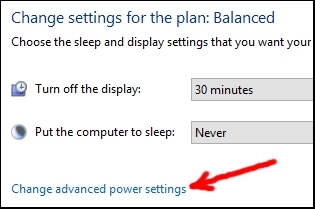
Set "Power button action" to "Sleep":
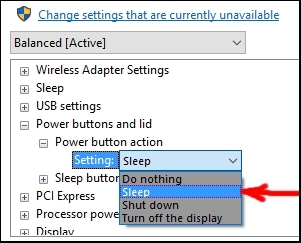
Note that from now on, you will have to press and hold the power button for several seconds if you want to shut down the computer the hard way. Next, set the option "Allow wake timers" to "Disable":
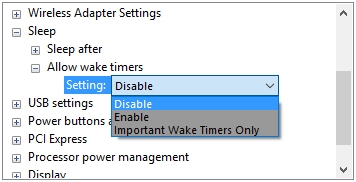
If your version of Windows does not have this option, that's OK, we will use PowerShell to change this parameter below. If you have a wireless (USB) mouse, then my advice is to disable the option "USB selective suspend":
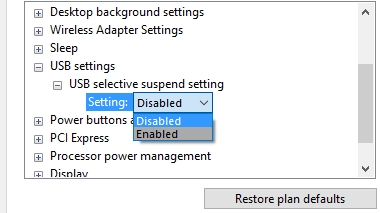
This action will make the wireless mouse more responsive. Click "OK" and close the control panel window.
3) If you successfully disabled wake timers as described above, then skip to point # 4. Otherwise, launch "Windows PowerShell" (Start button → "All apps" or Programs) as an administrator:

and copy and paste the following code by right-clicking in the PowerShell window:
Get-ScheduledTask | ? { $_.Settings.WakeToRun -eq $true -and $_.State -ne "Disabled"} | % { $_.Settings.WakeToRun = $false; Set-ScheduledTask $_ }
This code disables all "wake the computer to run this task" options in Windows Task Scheduler. Press the Enter key to launch this script (you won't see anything). Close PowerShell (big credit to the original coder: Ilan Lanz of ilantz.com). In the latest versions of Windows 10, this procedure may fail.
4) Go to the Control Panel → Security and Maintenance → Maintenance → "Change maintenance settings":
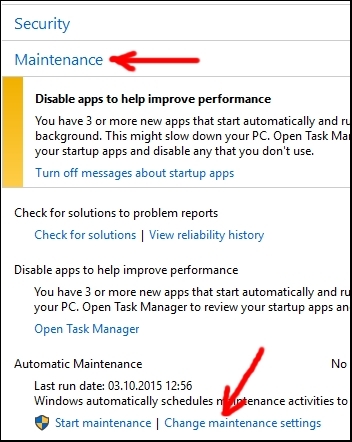
and uncheck the option "Allow scheduled maintenance to wake up my computer at the scheduled time" and set the time to the one when your computer is always awake:

5) Launch Windows Command Prompt as an administrator

and execute the following command (copy, paste by right-clicking, and press Enter):
for /F "tokens=*" %A in ('powercfg -devicequery wake_armed') do powercfg -devicedisablewake "%A"
This command disallows any devices to wake the computer (credit to Dmitriy at www.winitpro.ru). Now you can verify whether the above actions worked.
6) While in Command Prompt, enter the following command to see if any devices are currently allowed to wake the computer:
powercfg /devicequery wake_armed
also:
powercfg /waketimers
Even if you disabled wake timers as described above, some Windows tasks waking your computer may still be present. Leave them alone because they are absolutely necessary for Windows health, and your computer will most likely go back to sleep after these brief tasks. All done. In the future, to find out which device/task woke the computer the last time, type this command in Windows Command Prompt (run as admin):
powercfg –lastwake
Note that sometimes, this action will tell you nothing about who woke the computer (probably some deep system process). In this case, the Windows Event Viewer will also show you a wake event but will not tell you which process did it. The above plan can prevent such anonymous waking.
Please do not install any free diagnostic programs for troubleshooting of Windows such as Advanced SystemCare, System Mechanic Free, or Glary Utilities, especially do not use any registry cleaners of any kind. Such software can do more harm than good and is written by people who think that they know more about Windows than Microsoft does. Therefore, you need to steer clear of this kind of software. Only one exception is Chris Titus's Windows Utility, where you can safely use options for disabling telemetry and for disabling Windows updates (I do not recommend any other tweaks). He also recommends uninstalling NVidia drivers (if you have them) and installing them by means of NVCleanstall to disable NVidia telemetry. Good idea.
Even in countries with relatively strong protection of intellectual property, a large percentage of software (15–25%) is pirated. Otherwise upstanding citizens think nothing of downloading cracked software by means of torrents or websites such as repack.me, monkrus.ws, or lrepacks.net. If your priority is stability of software, then you should steer clear of pirated software because it usually contains minor defects because of repeated copying on the Internet or the imperfect activation procedure or may be infected with malware (by the way, website virustotal.com can scan a file using many antivirus programs simultaneously).
Finally, it's a good idea to hoover the insides of your computer twice a year because dust accumulates there and may cause some problems. This cleaning procedure is described at the end of the section "How to create a System recovery drive."
In conclusion, I will share my thoughts on popular arguments against Windows that are advanced by proponents of Macintosh or Linux.
In conclusion, I should say that I update this manual from time to time; therefore, feel free to download the latest version. Also check out my other ebook How to Become Smarter.
Enjoy your PC!
(This protocol will not work for motherboards manufactured after 2017.) First, launch Speccy and find out the manufacturer and name of the model of the hard drive that you are trying to check for errors. Write them down on a piece of paper (or in your smartphone).
Windows utility CHKDSK is not the best way to scan hard drives for errors. In fact, if you have a large drive (3 terabytes), CHKDSK may take too long and not finish the job properly. For such large drives, you need to run CHKDSK overnight (and don't worry if it gets stuck at 20% and then nothing happens for a long time). Its user interface leaves much to be desired. If the hard drive contains many errors, CHKDSK will get stuck and fail even after an overnight scan.
A freeware called MHDD is much better. The procedure is a bit technical, but yields much better results than CHKDSK. MHDD does not run under the latest versions of Windows, and you will have to launch it in MS-DOS mode as described below. Even if this program works in your version of Windows, I still strongly recommend to run MHDD in MS-DOS mode to obtain the most reliable results. If your hard drive is accidentally used by Windows or by you during the scan procedure, then the scan results are likely to get screwed up.
Before you attempt to fix bad sectors and errors on your hard drive, copy all the vital data on this drive (which you cannot afford to lose) to some other place. The scan/repair operation that is described below may damage these data because a bad sector may contain correct information, even though it longer works properly. When the scan/repair operation makes this bad sector invisible (hard drive will no longer use it), your data will be slightly damaged if the sector was not in the empty space on your hard drive. You don’t have to back up all the data on your hard drive, for example, movies and music that you can redownload later don’t have to be backed up. Even if a movie or an MP3 file will get slightly damaged by the above operation, it will still be usable in most cases, only one second of it will be corrupted and the rest of the file will be fine.
Now that you made a copy of all your critical data, let’s fix your hard drive, so that it is free of errors and bad sectors.
If you are going to scan an IDE drive (launch Speccy to find out whether you have a SATA or IDE drive), then you need to make sure that it is set to “master” not “slave.” You can switch it back to slave after the MHDD scan. If you have never disassembled your computer before, then you need to be extremely careful regarding static electricity, wear rubber gloves and ground yourself periodically. Also be gentle, try not to break anything inside with any sudden movements. If you have a SATA drive, then you don’t have to worry about the slave settings.
Next, go to the website http://hddguru.com/software/2005.10.02-MHDD/, and download the CD image of MHDD (an .iso file).
Burn the CD image to a blank writable CD to create a bootable CD. In Windows 8.1 or 10, you can simply insert the writable CD into your CD-ROM or CD/DVD-ROM, then right-click the .iso file and select “Burn CD.” For other versions of Windows, you can find some freeware program that deals with CDs and DVDs and ISO files. Don’t try to create a bootable USB drive from this .iso file, it won’t work. When the CD image (.iso file) is successfully placed on your writable CD, you won’t see anything on the CD except for a text file that says “Boot from this CD.” This is normal. To boot from this CD and to launch MHDD in DOS mode, restart Windows and press the magic key to enter BIOS (UEFI) settings.
Edit your BIOS (UEFI) settings: Restart your computer and examine the first images and text that appear on the screen (a.k.a., the "motherboard splash screen"). It should say at the bottom of the screen something like "Press Del or F12 to enter Setup." Restart your computer again, and repeatedly press the key that was mentioned during the splash screen. This is the "magical key" that you can use to access BIOS (UEFI) settings. In case your computer has the "Fast boot" option enabled, then you won't see the motherboard splash screen during the startup, but you still need to find out the name of this magical key for your motherboard. Search the Internet to find out which key has to be pressed on the keyboard to enter the BIOS (UEFI) settings for your motherboard (before Windows boots). Restart the computer and press this key repeatedly.
If you entered the BIOS (UEFI) settings successfully, find the Boot menu and set Boot priority to the CD-ROM. You may not recognize the CD-ROM or DVD-ROM among the listed drives there. In this case, select the drive that has the size of 1 MB or something like that. Your goal is to make sure that your computer first tries to boot from your CD-ROM and second from your system drive (C:).
Exit BIOS (UEFI) settings, saving your changes.
The computer will restart and if the CD is already inserted, then the computer will boot from the CD.
You will see some Windows 98 information and will be prompted to select an option with or without SCSI support; select the default option.
Then you will see the interface of the MHDD program.
It will ask you to select the drive number. You must know the manufacturer of your hard drive because the size is shown in the number of sectors not in megabytes. Usually, one sector is 512 bytes, but not always.
Enter the drive number and press the Enter key.
To scan the drive for bad sectors with automatic fixing of bad sectors (so that they will no longer be used by the hard drive and by Windows, i.e., they will become “invisible”), press the F4 key (the Scan command) and using up and down arrows on your keyboard select the REMAP option and press the Space key to turn it on. Press F4 to launch the scan/repair. There is another option there, Erase Delays. It makes sectors that are slower than normal also invisible. There are approximately 0.5% of such sectors on your hard drive. Of course, if your hard drive is not empty, most of your data will be corrupted if you select this option because roughly one kilobyte out of every 200 will be eliminated from your data. You can select option Erase Delays only if you are cleaning a new empty hard drive before use.
Once launched, the scan procedure will be showing you the sector counts on the right side of the screen: the total number of sectors scanned, the number of slower sectors (with a delay in milliseconds, ms) and the number of irriversibly damaged sectors (called “UNC” uncorrectable) if there are any. The time left is shown in the upper right-hand corner of the screen, and the percentage of the disk scanned is shown in the lower right-hand part of the screen. After the scan procedure is finished, your hard drive will be much more reliable because all bad sectors, if there are any, will no longer be used. If you have questions or problems with MHDD, see the documentation, FAQ, or visit the forum.
Recent major upgrades of Windows 10 (such as Fall Creators Upgrade) often fail to get installed (you may see a blue screen during installation), and thus Windows 10 rolls back to the previous Windows 10 version and then tries to install the upgrade again. On the other hand, if you don't want Windows 10 upgrades, you may get frustrated because Microsoft forces these upgrades on you. First, I will describe what to do if you want a Windows 10 upgrade but it fails to get installed. What you need to do is uninstall all potentially problematic software before the upgrade, then install the Windows 10 upgrade, and after that, reinstall the problematic software. Here is the sequence of actions:
Now, what if you want to prevent Windows 10 updates and/or upgrades? As mentioned at the beginning, Microsoft forces Windows 10 updates and upgrades on you through various clever ploys. I will review three scenarios.
1) Without your permission, Windows 10 downloaded a new version of Windows 10 (an upgrade, for example, "Fall Creators Upgrade") and is asking you to restart the computer to finish the installation. Don't despair, you can still stay with your current version of Windows 10. Download and install a program called Sordum Windows Update Blocker. Launch it and press the Disable button to disable Windows 10 updates and upgrades. After that, disconnect the Internet connection. Now go to drive C: and find a directory with a weird name (may contain dollar signs and/or the word "upgrade") at the very top or bottom of the list of directories there. It has a big size (a gigabyte or more) and contains a lot of files and folders that were created today. These are installation files for the new version of Windows. There may be two such directories on drive C:. In each folder and subfolder, delete all files created today. Next, go to the folder %windir%\softwaredistribution\download and delete all files created today. Now restart Windows by choosing the option "restart" instead of "restart and update"; if the "restart" option is not available, then choose "restart and update." The update/upgrade will fail, and Windows 10 will stay at its current version. Re-enable the Internet connection. From now on, make sure that Sordum Windows Update Blocker is in the "red" status always. It will stay in this status unless your manually switch it to the "green" status. As soon as you change the status to green (Windows updates are allowed), Windows 10 will start downloading the new version again. Suppose you permanently set the Sordum Windows Update Blocker status to red; if your version of Windows 10 is past its "support" date, then a few days later, an annoying icon "Your device is missing important updates" may appear in the lower right-hand corner of your screen. To disable it, press the "Start" button, choose "Settings," then "Personalization," and "Taskbar." Press the "Select which icons appear on the taskbar" link and turn off "Windows Update Status." To permanently disable the annoying icon, launch regedit, go to HKEY_LOCAL_MACHINE\SOFTWARE\Microsoft\WindowsUpdate\UX\Settings and in right-hand panel, right-click and select "New" and "DWORD (32-bit) Value." Give this DWORD the following name: TrayIconVisibility and set its value to 0. Close the registry editor. To immediately hide the Windows Update Status icon, restart your computer. Alternatively, wait a day or two and it will go away by itself. (Credit for the icon hack goes to Vishal Gupta from askvg.com.)
2) Windows 10 downloaded some updates (not an upgrade to a new version) and is asking you to restart the computer. If you don't want these updates, let them install nonetheless by restarting the computer. Download Sordum Windows Update Blocker but don't launch it yet. Disconnect the Internet connection and go to Control Panel, Programs and Features, and press the "View installed updates" link. Right-click and uninstall the Windows updates that you don't want. Finally, launch Sordum Windows Update Blocker and press the Disable button to disable Windows 10 updates and upgrades. Re-enable the Internet connection.
3) Let's say you keep your Windows 10 in place by means of Sordum Windows Update Blocker, but you want to install some Windows 10 updates without an upgrade to a new version of Windows 10. A convenient way to do so is software called WSUS Offline Update. First, you download the updates that you need using this program on any computer with an Internet connection; then, you copy the whole program folder to the computer that you want to update, turn off the Internet connection and Sordum Windows Update Blocker, and launch the .exe file in the folder "client" to start Windows updates.
The Sordum Windows Update Blocker software can cause some minor easily solvable problems. For example, activation of Windows or Office may disappear once every few months. To activate them back, turn off Sordum Windows Update Blocker and run activation over the Internet or re-enter your product key. DISM and installation of Windows Store Apps won't work either while Sordum Windows Update Blocker is active.
This is the most laborious and time-consuming way to repair Windows but is necessary in rare cases. Use the checklist below as a reference in such situations. Before you proceed, please consider the easier approaches described at the beginning of this ebook.
1a. Save any personal folders and documents stored on the C: drive
1b. Save all data from a Virtual Machine if you have one.
2. Run CHKDSK for the C: drive.
3a. Unfortunately, there is no easy way to back up Microsoft Office settings. Microsoft stopped providing this kind of software after Office 2007. Write down all the information that you can gather by hand. Don't try to copy registry entries or to use third-party software such as Cloneapp or PCmover. They will damage your Office installation and/or your Outlook data file. Microsoft Office is so mind-bogglingly complex that third parties will never be able to create a reliable tool of this sort and take into account all possible scenarios if Microsoft itself can't. Cloneapp and similar applications can be useful for simple software, not for Office or Windows.
3b. Save all the files and shortcuts located on your Desktop
4. Create a C: drive image using AOMEI Backupper Standard
5. Back up all personal documents
6. Print out Windows Product Key
7. Find and save all the information necessary to set up your Internet connection
8. Download and store in a separate location all latest Visual C++ Redistributable packages (both x32 [i.e. x86] and x64 if you have x64 Windows).
9. Download all latest .NET framework packages
10a. Download and store in this location the latest video adapter driver
10b. Download and store in this location all the latest device drivers from the website of your motherboard manufacturer (if you have a desktop PC) or notebook manufacturer.
11a. Make sure you have all the necessary information and files to reinstall your programs.
11b. Write down your Windows username and password.
12. Insert the DVD disk or USB flash drive carrying Windows installation files
13. Restart and before the splash screen appears repeatedly press the key that gives you access to the BIOS (UEFI) setup
14. Rearrange the boot sequence so that the computer boots from your DVD or USB flash drive
15. Save and exit BIOS settings
16. Perform clean installation of Windows (choose the option that installs only Windows and does not preserve settings and files), do not choose "Upgrade Windows"
17. During the installation create the same username and password as you had before.
18. Connect to the internet.
19a. Install the antivirus software.
19b. Restore Windows Firewall settings and/or Antivirus settings.
20a. Go to Windows Update settings, but do not press the "Update" button yet.
20b. To prevent Windows 10 from upgrading (e.g. from version 1803 to 1903), in Advanced Options, set 365 days as the wait period for a feature update. Set zero days for quality updates.
20c. If you accidentally started downloading a Windows 10 upgrade, immediately disconnect internet (otherwise skip ahead). Let Windows finish some other updates. Set the Advanced Options as described above. Now go to Control Panel, Troubleshooter, and repair Windows Update so that unfinished updates are not finished, and choose to repair the Windows Update database there. Next, right-click drive C:, select Properties, Disk Cleanup, then select "Clean up system files" and in the options select "Windows Update cleanup". Click OK. This may take a long time, let it finish. All done. Now you can install Windows Updates without a Windows Upgrade.
21. Install all Windows updates.
22. Run System File Check.
23a. Go to Control Panel, Programs and Features, "Turn Windows features on or off" and enable all options for the latest .NET framework (don't have to do anything with an older .NET framework).
23b. Run DISM or System Update Readiness Tool.
23c. Create a System Restore point.
24. Install Visual C++ redistributable packages, .NET framework package(s), video adapter driver, and all other device drivers.
25a. DO NOT use any software for updating drivers. (You can use this kind of software only if it is provided by the manufacturer of your motherboard or notebook along with the device drivers.)
25b. Create a System Restore point.
25c. Change Windows Privacy settings.
26. Install all programs.
27. Restore program settings and Windows settings. Yes, you will have to recreate Microsoft Outlook e-mail accounts by hand and connect them to your old Outlook data file.
28. Change privacy settings in Web browsers and other software.
29. Create a System Restore point.
30. Create an image of drive C: in AOMEI Backupper Standard.
31. Create a Recovery drive.
Some pictures, including the cover, are from Freeimages.com
→ ▪ ▫ ▪ ▫ ▪ ▫ ▪ ▫ ▪ ▫ ▪ ←